Finally Ready To Set Up My 55-gallon Saltwater Tank

eschaton

Fishaholic
Joined
Sep 17, 2006
Messages
671
Reaction score
0
Location
Pittsburgh, PA
Hey all, I posted on this some months ago, but now my girlfriend and I finally finished the stand (she had us buy it as a kit, and it took forever to put together, sand, and stain).

Anyway, right now I have, aside from the stand:

55 gallon tank, pre-drilled in two places, with the back sprayed
My light (Current Nova Extreme T-5 x 8)
The eventual sump tank (20-gallon high - has small chip in one corner, but still holds water fine).
Heater

I still need to buy a number of things, including the pump (don't know what to do here), an RO system, possibly a skimmer, etc.

But the actual setup is bewildering to me. I'm not very mechanically inclined. Here's what I can figure out for steps

1. In the tank I need to construct some sort of acrylic column things with weir teeth on the top. I know that there are bonding agents to weld acrylic to itself, but I don't know how I'm going to attach it to the glass. I also need to buy bulkheads, but I don't know which kind are best.

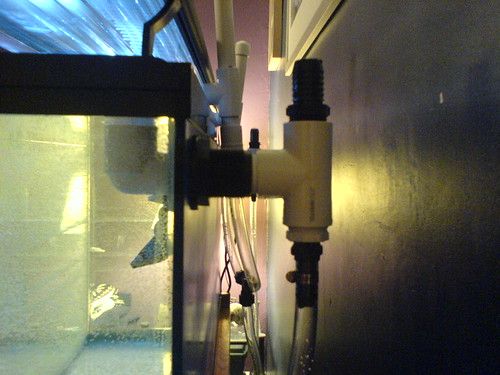
2. The plumbing. I think I want to use flexline as it seems more forgiving (I'm not very methodical and am worried about measuring 1/16th off for some pipe or another. I think just some lines straight down ought to cover it, but people mention these things called check valves and ball valves, and I don't know how useful/important they are. I have no idea what you use to weld pipes together either - silicone?

3. The sump itself. To keep it easy, I think I just want to have two baffles. I'll get the glass cut somewhere and silicone them in, but I'm not sure how you get the glass to stand upright inside the tank while the silicone is drying - and I'm really not sure how you suspend the second baffle. The main chamber will just be open and used for macroalgae - I'd rather use that for nutrient absorption than a skimmer. I'll just put the pump in the water and not drill the sump myself to make it easier.

I find it shocking while I can find a ton of stuff online about individual fish, there is almost nothing about aquarium plumbing except really generic diagrams that don't explain the tools you need. Any detailed help will be much appreciated, as I'm feeling really overwhelmed thinking of the complexity of all this.
 
1 - Silicone is the best way to attach the dividers

I used these bulkheads - http://www.fishfurfeather.com/rigid-pipe-a...20_121_127.html

no complaints

2 - Personally I wouldn't put much faith in a check valve as they are never 100% and can easily get a bit of debris etc lodged in them. Ball valves are slightly different but again can cause issues (i got a snail stuck one once and it flooded the lounge...). I would try and set the plumbing up so that there isn't a need for either, by raising the sump return pipe above the water level in the display tank and making sure there is a way for air to get in, you cut out the chance of a back siphon into the sump at which point the valves are pretty redundant.

With the pipe work that those bulkheads are associated with you just need to use PVC cemment for the parts, then there are numerous adapters for attaching flexible tubing.

3 - Have a look through some of the tank journals, ideally you'd 90 degree clamps etc, but more realistically people end up using whatever will support them. Video cases, books etc.
 
1. Home Depot and Lowes now sell a silicone designed for bonding acrylic to glass (and acrylic to acrylic), might wanna pick some of that up :)

2. I assume you'll be drilling the back of the tank and using a calfo overflow. DO NOT attempt to drill the bottom! US tanks have tempered glass bottoms and will shatter if you try and drill them. Check valves should go on the return side to prevent back-siphoning. And true-union ball valves should be installed by any piece of equipment likely to need regular maintenance.

What pump are you planning on using for your return pump?
 
1 - Silicone is the best way to attach the dividers

I used these bulkheads - [URL="http://www.fishfurfeather.com/rigid-pipe-a...20_121_127.html"]http://www.fishfurfeather.com/rigid-pipe-a...20_121_127.html[/URL]

no complaints

2 - Personally I wouldn't put much faith in a check valve as they are never 100% and can easily get a bit of debris etc lodged in them. Ball valves are slightly different but again can cause issues (i got a snail stuck one once and it flooded the lounge...). I would try and set the plumbing up so that there isn't a need for either, by raising the sump return pipe above the water level in the display tank and making sure there is a way for air to get in, you cut out the chance of a back siphon into the sump at which point the valves are pretty redundant.

With the pipe work that those bulkheads are associated with you just need to use PVC cemment for the parts, then there are numerous adapters for attaching flexible tubing.

3 - Have a look through some of the tank journals, ideally you'd 90 degree clamps etc, but more realistically people end up using whatever will support them. Video cases, books etc.


1. Those are in metric sizes, so I'm not sure they'll work for me.

2. So the way I could do it is by using a "T" connection and leaving the top open?

1. Home Depot and Lowes now sell a silicone designed for bonding acrylic to glass (and acrylic to acrylic), might wanna pick some of that up :)

2. I assume you'll be drilling the back of the tank and using a calfo overflow. DO NOT attempt to drill the bottom! US tanks have tempered glass bottoms and will shatter if you try and drill them. Check valves should go on the return side to prevent back-siphoning. And true-union ball valves should be installed by any piece of equipment likely to need regular maintenance.

What pump are you planning on using for your return pump?

2. Tank is already drilled - two holes on the back in each corner. I was planning on doing the columns rather than a calflow mainly because this means I have to take the tank down again and lay the tank on its back, but it seems like the positives outweigh the negatives.

I know I can get the acrylic cut at home depot/lowes, but how do I cut the teeth for the weir? I don't own any power tools.

Not sure what pump I'll use yet. Any suggestions?
 
And true-union ball valves should be installed by any piece of equipment likely to need regular maintenance.

Personally i think anything that narrows pipe work is a place where something is more likely to get stuck and cause either a mini disaster or the NEED of maintenance.

It's personal preference I suppose, you set up your plumbing with no need for check / ball valves quite easily.
 
Well, if you want teeth (and you don't HAVE to have them) you'll need a powertool of some sort. Your options are; End mill, table saw, fine-bit router, or a dremmel with the routing attachment. Could you maybe borrow or have a friend who owns one?

For a 55g, I'd be looking at 5' of head and 250-300gph. That puts me in the Danner Mag 5 range. Which I would overflow with two 1" drains minimum, prefferrably 2 1.5" drains
 
Well, I set up a whole piping setup, realized I did it wrong, then set up a new one. Here's the deal.

Outflow goes into two 1" bulkheads. Tank side just currently has two elbows screwed in facing upward. The holes seem perfectly drilled, so with these in place I shouldn't need a box for proper water level. I'm planning on stuffing some cut sponge or something into the front of the pipes to stop snails from crawling in - hopefully it wont slow down the flow much, and I'll be able to make due without boxes. On the outside, the bulkhead is attached via a male to male thread to a 1" T, which is open on top, and has a reducing bushing to 1/2 inch on the bottom. Then that goes into a barbed fitting, with 5/8 tubing clamped on.

My pump will be an eheim 1260. 5/8ths also for the return line. It gets split as it goes up, and converts to 3/4 inch hard piping. Again I have a threaded T open on the top, so as to eliminate the need for a check valve. The front of the T connects to an elbow pointed down - when I get my spraybar and accessories, I might switch this out, but I have a feeling the elbow will help balance the weight and clamp the returns onto the back of the tank fairly snugly.

I'm unsure on the real need for cement. All fittings except for a small section of the return are threaded. The last plumbing bits (along with the pump, an ATO, a refractometer, and my substrate) will be coming in the mail some time next week). Still need to get the glass cut and set it into the sump. Hopefully the test run can be within two weeks.
 
Tough to figure out the whole thing without pics/drawings. Some words of caution though, pressure-side fittings (from pump to tank) will NEED glue if they're slip. If they're threaded, use teflon tape :).

Do NOT use foam on drain side. It WILL get clogged eventually and you'll overflow the system. You CAN find strainers that fit on the piping and keep snails/debris out.
 
Well, my setup is almost complete (minus the baffles in the sump) so I decided to fill up the tank and do a "wet run" to look for leaks. No leaks, but there are two issues, one major, and one minor.

Major issue involves jets of water coming out of the airspace I put at the top of the returns. Air was exposed at the tops of a one inch "T" plumbing piece, with the bottom of the T pointing forward and attached to a down elbow. The top branch of the T was open to the air - I figured the water would take the path of lowest resistance, but no such luck. Cutting and adding eight inch standing pipes and putting them into the open top branch didn't help much either.

So I decided to try putting on end-caps without sealer and see what happened. The end caps didn't leak or pop off, though after turning off the pump the returns began to siphon into the pump. I gingerly removed the endcaps, and there was no explosion of water - after priming the water climbs no more than halfway up the standing pipe. But of course turning the pump off and on again caused foot-high jets which made a mess.

So, my system is currently damned in two different ways. Either I have the caps on, and the sump will flood whenever there's a power outage, or I don't have caps on, and my living room floods every time the power comes back on.

I have a feeling that the eheim 1260 is too powerful for the plumbing setup it's in. Moving up from 3/4 fittings a larger diameter may help. A ball valve undoubtedly would help, but that defeats the purpose of having a powerful pump. I think the easiest solution is to cap the standing pipes and install a check valve, though my understanding is even checks fail eventually.

The most attractive idea I can think of is to install check valves on the top of my standing pipes. This would allow the downward flow of air, but not the upward gush of water during the priming process. Since the active pressure on the check valve would be very rare (only during primings after servicing and power outages) my guess is it will be longer lasting.

The second, more minor problem is with gurgling in my supplies. As with the returns, I heard it was a good thing to make sure air could get into them. The noise is terrible, with one far worse than the other. I stuffed sections of a filter sponge into them, which has cut down on but not eliminated the noise. Placing endcaps on these openings all but stops the noise, with no further siphoning as with the returns (not surprising due to the difference in water level). I'm concluding back-siphoning isn't an issue here. I'll probably rubber band something airtight over the holes if no one sees an issue (the tops are actually hose barbs, so there's no easy way to cap them.
 
You dont need a T-fitting on the return side. It will result in exactly what you saw lol. You could install a ball valve for when you are doing maintenance so the water doesnt flow into the sump. In case of power failure, it will only siphon to the level of the bulkhead which im assuming is at the top and will only be minimal until the water level drops below the bulkhead. A check valve should be added if you still have concerns.
 
Again, kind of hard to discern what's goin on without pics. One question though, why the tee fitting on the return line? Its not necessary and furthermore the whole return should be sealed.
 
My ancient digicam is essentially totally broken now (and I can't even use it with this confounded vista machine), and my girlfriend can't figure out any way to get pictures off of her camera at the moment, so I'm unsure any pictures are on their way.

To answer your question, I thought from @ombomb said it was important to allow air to get into the return line so as to stop the chance of siphoning. When I cap off the return line, I know siphoning does happen on my system. I've also read multiple places that at least a small drill hole in the top of a vertical pipe on top of your return cuts down on noise significantly

I suppose I could cap off the ends tomorrow if everyone concurrs on that. I'll need to figure out some other way to make a siphon break. Some other pages refer to a hole drilled in the pipe below the water level, but nothing but the flex-lok is actually below water.
 
Ahh, I think I got a file online finally...

2224641067_842a0c6f4b.jpg


You can see one of the two supply lines in the front. They both go down in separate lines to the sump. In the background are the two return lines with the standing pipes and caps added to the top.
 
Ok lets see if I can clear up some confusion :). holes need to be drilled in the drain line to allow air in the drain tube. This creates a constant flow of water to eliminate gurgling noises on the drain side. Returns should be mounted near the top of the tank to prevent siphon. Furthermore, a check valve should be used on the return to prevent siphon. Always have 2 levels of protection.

How did you do your drain? Drill the bottom or back? Internal or external box?
 
You can see in the picture the drains are drilled in the back of the tank close to the surface. Even without any attachments, standard 1 inch elbows line up almost perfectly with the water level (only a few mm off). No box, but I do think I'll try screwing in some threaded bulkhead guards after cycling - hopefully it won't raise the water level too much higher.
 

Most reactions

trending

Staff online

Members online

Back
Top