Hello, this is a CO2 reactor I made quite cheap with parts from B&Q, your local B&Q may be different than mine (I doubt it though) and you may be able to get better parts than this but you will get the general idea anyway.
Total cost was about €17 or about £11.50 and I have enough pipe to make another, so for about €25 (£16-17 ) you could make two of these.
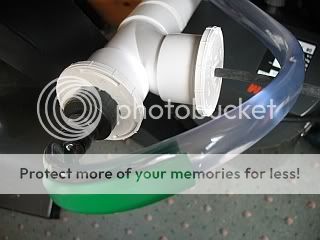
The original design that didn't work too well, (too long in the picture it was cut before I glued it together) but I made it anyway and modified it later, it was noisy because it got airlocked very quickly and didn't seem to dissolve the CO2 too well, the bend in the pipe at the top didn't help here and also the CO2 injection position was too high IMO, once I changed it so the flow went straight through the pipe and lowered the CO2 injection position it worked very well and didn't get airlocked, it does get airlocked but only much later in the day, this seems to be the case with most CO2 reactors, what the airlock is, is still under debate in the various planted forums around the internet, some say its CO2 some say its a different gas, who knows.
Overall size of the reactor is 18 inches and I have it running on a 40 US gallon tank with an Eheim 2215 filter.
The idea behind this type of reactor is that the water flow enters through the top, once the water enters the chamber of your reactor it will slow down somewhat because the PVC pipe is wider than your cannister filter tubing, your CO2 bubble is injected a few inches (about 6 inches in this case) below the top of the reactor, the idea is that the bubble will want to rise to the top but your water flow will keep pushing the bubble down and therefore dissolves the CO2, basically it works on gravity and the fact that the flow has been reduced so in theory the bubble will bobble up and down in the reactor chamber, the reactor is set at about a 45 degree angle in your stand so the bubbles don't shoot straight out the bottom which would happen if you laid it flat, they stay in the chamber until there is none left to dissolve, that's the idea anyway.
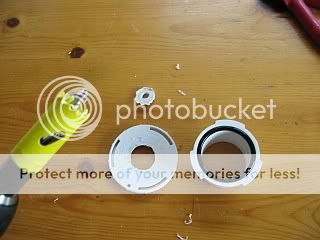
These are the original pieces I made the reactor with, there are no bioballs in the reactor or any other media, there is no need, the water flow and gravity dissolve the CO2.

This is the piece for the top and bottom of the reactor, I used this type because it is removable to access the reactor if ever there is a problem , I drilled a hole with a holesaw set in each one to fit the hose connectors.
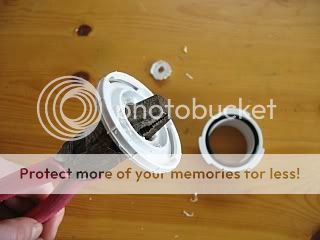
Made sure the hose connectors would fit well didn't want to make the hole to big initially, I just widened the apature a little with the sides of a pliers, just pared the hole bigger with a twisting motion until it was a tight fit for the hose connector, and then I snapped it through, there is a lip on the orange piece which stops it going through the hole completely, add solvent to this lip before you push it through.
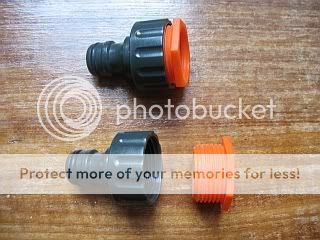
These are the hose connectors, they come in two parts which screw together, got these in the garden equipment section.
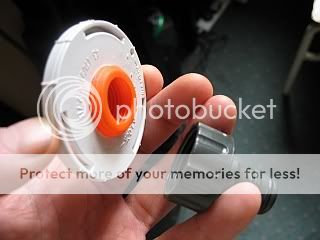
This bit is self explanatory, once you have this bit finished the rest is easy, just use lots of solvent cement here to make the fittings watertight, the idea is to glue everything together, the hose connector will not be removable from the cap once this is done, but the cap will just screw off the pipe, so it can be removed that way. Just push the orange bit through the hole and glue everything up, use lots of glue for the edges etc, has to be watertight.
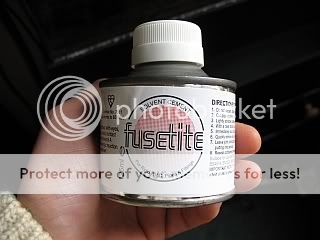
This is the sort of pvc cement you want to use, its like a clear sticky glue, sets in minutes but needs 24 hours to cure correctly. Any brand will do, usually sold in containers like this, brush is included in the head of the container.
This is the original head that didn't work too well, just showing you to avoid making it this way, looks nice but doesn't work!!
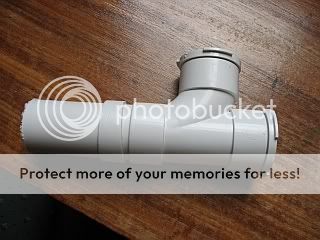
The offending piece removed.
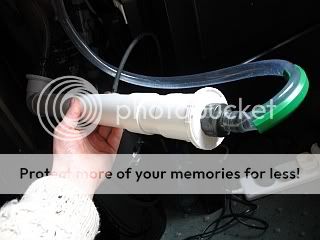
This is the reactor now, couldn't get a better picture because I have it in use, but you get the idea, just has a 90 degree bend piece at the bottom so it can be laid down on this section, hose piping connects to it and goes straight up to the tank, I lowered the CO2 hosing down about a third of the way down the reactor, drilled a hole in the pipe and used a nipple from a hagen ladder set, glued it in with the solvent cement and connected the CO2 pipe. It looks further down in the shot bt its only about 6 inches, think this is a better way than having it up high, if the unit gets airlocked later in the day, as you inject the fresh CO2 at least its entering water and some will get dissolved that way than if you have it lower down, most designs have it higher up but don't consider this fact IMHO.
Anyway that's it, thought some of you may be interested, pretty easy really, cheap as well, no need for any media in the reactor either, that just cuts down the flow, one bubble per second gives me 20ppm of CO2 using this reactor so it is an efficient way to inject CO2.
Oh yeah last thing, the reactor is placed on the output side of your filter ie. the side of the filter where the water flow enters the tank.
Total cost was about €17 or about £11.50 and I have enough pipe to make another, so for about €25 (£16-17 ) you could make two of these.
The original design that didn't work too well, (too long in the picture it was cut before I glued it together) but I made it anyway and modified it later, it was noisy because it got airlocked very quickly and didn't seem to dissolve the CO2 too well, the bend in the pipe at the top didn't help here and also the CO2 injection position was too high IMO, once I changed it so the flow went straight through the pipe and lowered the CO2 injection position it worked very well and didn't get airlocked, it does get airlocked but only much later in the day, this seems to be the case with most CO2 reactors, what the airlock is, is still under debate in the various planted forums around the internet, some say its CO2 some say its a different gas, who knows.
Overall size of the reactor is 18 inches and I have it running on a 40 US gallon tank with an Eheim 2215 filter.
The idea behind this type of reactor is that the water flow enters through the top, once the water enters the chamber of your reactor it will slow down somewhat because the PVC pipe is wider than your cannister filter tubing, your CO2 bubble is injected a few inches (about 6 inches in this case) below the top of the reactor, the idea is that the bubble will want to rise to the top but your water flow will keep pushing the bubble down and therefore dissolves the CO2, basically it works on gravity and the fact that the flow has been reduced so in theory the bubble will bobble up and down in the reactor chamber, the reactor is set at about a 45 degree angle in your stand so the bubbles don't shoot straight out the bottom which would happen if you laid it flat, they stay in the chamber until there is none left to dissolve, that's the idea anyway.
These are the original pieces I made the reactor with, there are no bioballs in the reactor or any other media, there is no need, the water flow and gravity dissolve the CO2.
This is the piece for the top and bottom of the reactor, I used this type because it is removable to access the reactor if ever there is a problem , I drilled a hole with a holesaw set in each one to fit the hose connectors.
Made sure the hose connectors would fit well didn't want to make the hole to big initially, I just widened the apature a little with the sides of a pliers, just pared the hole bigger with a twisting motion until it was a tight fit for the hose connector, and then I snapped it through, there is a lip on the orange piece which stops it going through the hole completely, add solvent to this lip before you push it through.
These are the hose connectors, they come in two parts which screw together, got these in the garden equipment section.
This bit is self explanatory, once you have this bit finished the rest is easy, just use lots of solvent cement here to make the fittings watertight, the idea is to glue everything together, the hose connector will not be removable from the cap once this is done, but the cap will just screw off the pipe, so it can be removed that way. Just push the orange bit through the hole and glue everything up, use lots of glue for the edges etc, has to be watertight.
This is the sort of pvc cement you want to use, its like a clear sticky glue, sets in minutes but needs 24 hours to cure correctly. Any brand will do, usually sold in containers like this, brush is included in the head of the container.
This is the original head that didn't work too well, just showing you to avoid making it this way, looks nice but doesn't work!!
The offending piece removed.
This is the reactor now, couldn't get a better picture because I have it in use, but you get the idea, just has a 90 degree bend piece at the bottom so it can be laid down on this section, hose piping connects to it and goes straight up to the tank, I lowered the CO2 hosing down about a third of the way down the reactor, drilled a hole in the pipe and used a nipple from a hagen ladder set, glued it in with the solvent cement and connected the CO2 pipe. It looks further down in the shot bt its only about 6 inches, think this is a better way than having it up high, if the unit gets airlocked later in the day, as you inject the fresh CO2 at least its entering water and some will get dissolved that way than if you have it lower down, most designs have it higher up but don't consider this fact IMHO.
Anyway that's it, thought some of you may be interested, pretty easy really, cheap as well, no need for any media in the reactor either, that just cuts down the flow, one bubble per second gives me 20ppm of CO2 using this reactor so it is an efficient way to inject CO2.
Oh yeah last thing, the reactor is placed on the output side of your filter ie. the side of the filter where the water flow enters the tank.
 )
)