Aqua Nano 30 Diy Lid

Ch4rlie

Moderate Moderating Moderator
Staff member
Global Moderator ⚒️
Joined
Jul 16, 2013
Messages
8,873
Reaction score
3,188
Location
Oxfordshire, UK
A quick question here.
 
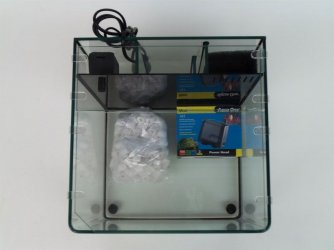
Am in process of making a new perspex lid for my GF's aqua nano 30 tank as she has 8 Endlers in this wee tank and they are renowned jumpers!
 
Already had one jump into the filter compartment at rear of tank where heater and powerhead is!
 
The lid that came with tank has gaps of about 8mm all along the side edges and a corner cutout as well, so decided to make a sealed lid without any gaps to try and eliminate any endless jumping out of the tank!
 
My question is, does the lid need to have air holes on top or small ventilation gap along edge (but under lid rather than side of lid) to stop condensation and to get oxygen into the water via the spray bar fitted?
 
Or can you get away with a sort of sealed lid with very little ventilation?
 
Thanks
 
Is this what you are talking about?  If you are going to make a new one I would drill 1/8 holes every 1/2  or 1 inch for some venting. You can use gragh paper as a template to make it look nice. If  you don't have an,y then find and image on the web and print it. If you are using clear plex then lay it on top of the grahp and use a wax pencil for your drill marks.
 

Attachments

  • 1.jpg
    1.jpg
    42.4 KB · Views: 917
Thats the exact same tank, yes.
 
That's good, I will do just that , drill some holes every 1", probably will do just 2 lines of 8 holes along the centre of lid.
 
Its clear perspex am gonna use.
 
Will post some pics when completed.
 
Thanks for your tips and advice. I was thinking best to have some vents just in case but just wanted confirmation to be sure.
 
No problem looking forward to the pictures
 
I have the nano 30 and the 40 and the lids are ridiculous with such a huge gap as a feeding hole!

I always put the cut out bit over the filter compartment so the fish can't jump out of it.

Even the gaps around the edge of the 40 I'm suspicious my betta if he tried could potentially squeeze through. Why these companies make them like this ill never know.

Not as bad as the arcadia range though - ive still to make room for mine but the lids on those are ridiculous :/


I think what msebar suggested is a good idea :good:
 
Shelster said:
I have the nano 30 and the 40 and the lids are ridiculous with such a huge gap as a feeding hole!

I always put the cut out bit over the filter compartment so the fish can't jump out of it.

Even the gaps around the edge of the 40 I'm suspicious my betta if he tried could potentially squeeze through. Why these companies make them like this ill never know.

Not as bad as the arcadia range though - ive still to make room for mine but the lids on those are ridiculous
confused.gif


I think what msebar suggested is a good idea
good.gif
 
Yup, agree with you 100% here.
 
Not the best designed tank lid in the world but perhaps the designers were not thinking of fish that are renowned jumpers like, bettas, endlers and even for snails like nerites which apparently are escape artists.
 
Yes, GF want nerite snails as well......
 
Here are a few pics for the folks who want an idea of what we're talking about.
 
1_zps60a1bde7.jpg

 
The gaps along edges of lid, about 8mm...
3_zpsa2998a69.jpg
    
 
As you can see below, there is a corner part which has been cut out, this is for lifting the tank lid and perhaps as an feeding hole as well.
 
2_zpsb249caec.jpg
    
 
A nice looking lid but not the best, when you try to take lid off, you need both hands and the condensation drips off this like anything, then returning the lid is a bit of a faff as you need to line the plastic edge clips to the glass edge, a bit fiddly sometimes and becomes annoying after a while!
 
So, here is my sort of journal i am going to try and attempt to do a new DIY nano tank lid.
 
Planning stages, and I did do a to scale size paper of what I wanted (or rather more like what the GF wanted...)
 
5_zps2f99da13.jpg
 
 
(Note - The numbers and figures on the paperwork have been changed slightly, for those of you who want  exact dimensions, just ask me and I'll post a more detailed plan if you want this.)


6_zps878dad09.jpg

 
Ordered 2 sheets of 300 x 300 mm clear perspex and 100 x 300 black perspex, 5 clear hinges and 2 bottles of 100% cyanoacrylate.
All from eBay, came to about £25, am sure you can get these items cheaper than me as I only clicked on the first ones I wanted (no patience you see....)
 
Next stage is actual prep and drawing out the outline of what I want on the clear perspex, I used marker pen and a Olfa PC-L heavy duty plastics and laminate knife. A good tool if you want clean cuts on perspex, simply score the knife along the line a number of times and simply snap the plastic and you will have a neat line. Took a few practice goes before I got the hang of this properly (turned the air blue when I went wrong on my first serious attempt!) lol 
blush.png

 
7_zpsdb513db7.jpg

 
Thats why I bought two sheets of clear perspex, just in case I went wrong, and luckily I did too 
tongue2.gif

8_zps7068e726.jpg

 
Rounded off the edge of main sheet of perspex so that follows lines of nano tank, used rough sandpaper at first then fine sandpaper to finish off. 
 
Stage one complete!
 
Stage two! 
smile.png

 
9_zps3372947e.jpg

 
Black perspex cut to size, realised I ordered too much but better too much than too little!!
 
Glued onto the clear plastic, also glued the hinges on as well....
 
10_zps5309556d.jpg

 
Then as an afterthought, glued on two small pieces of clear plastic on side, this will help stop lid moving sideways when on the tank, realised when I tried lid on tank for size without this, the lid moved around way too much for my liking ....
 
11_zps0ed0fd79.jpg


Stage two complete...
smile.png

12_zps15b7151a.jpg

 
This glue I ordered off eBay is trade stuff, excellent and super strong, very clear as well, almost like water! be warned though, I almost glued my own thumb on one of the hinges, and very nearly could not get thumb off, lost some skin! lol 
happy.png
 
Stage 3
 
13_zpsac4d68b7.jpg

 
Marking out the position of ventilation holes on main lid part.
 
14_zps5ea3d7ff.jpg

 
Used 4mm drill bits spaced every 1 inch part.
 
Be warned though, drill very slowly as this is plastic, drilling too fast will result in melted or cracked holes. This happened on first hole I did, drilled a wee bit too fast and resulted in minor cracks but not too bad.
 
When I say drill slowly, I do mean slowly. Used a Dewalt 18V drill at lowest setting and not pressed trigger all the way.
 
 
Finished results, you will notice a bit of condensation already, this is within 5 mins after putting lid on tank.
 
16_zpsf302a863.jpg

 
17_zpse3d332fd.jpg

 
Pic above, you will see a slight overhang of perspex over front of tank, this is the handle for lifting the lid.....ahhhh yes, have thought of everything! 
 
 
If you compare these 2 pics below to my original pics I first posted, no gaps at all 
happy.png

 
18_zpsa08a5e0b.jpg

 
19_zps32ca37cd.jpg


You may have noticed among my first few pics of when I did cut out of clear plastic there were 3x 7cm rectangular cut out at end of narrower sheet, this is why....
 
To have space for the wiring, and light fitting, have one in middle just in case i decide to upgrade lighting in future, also makes it look nice!
21_zpsb0b2b821.jpg

 
20_zps21bd934e.jpg


The narrow piece black perspex I cut out and glued on ....
 
This is to close the gap between main tank divider to filter compartments, already had one endler jump to filter compartment before I fitted the new lid. Also tied a piece of black sponge to filter slot on top right of main tank divider to stop any endlers getting through the filter slots
(difficult to see in pic, too dark..
22_zps0c27ebbd.jpg

 
Am pretty pleased with the results. Much much better in my opinion, the ease of use is better already and does not spoil the look of the tank 
smile.png

15_zpsdbb9bc45.jpg

 
Am now considering adding another row of holes as not sure if theres enough ventilation.
 
What do you think?
 
Realise there is now a stage 4!
 
Anyone guess what this is?
 
23_zpsa505a682.jpg

 
Much to my annoyance, I found that I could not get lid to stay up to make things easier for water changes, maintenance, etc.
 
So I quickly cut out a few pieces of plastic, glued them together and made the above for this............
 
24_zpsd744237a.jpg

 
25_zpsa51d0a50.jpg

 
26_zps0c450913.jpg

 
NOW am satisfied 
yes.gif

 
Only thing left is the question about extra ventilation holes or not................
 
Ch4rlie - absolutely bloomin FANTASTIC!!!!!!!

My hubby is really good at DIY so I might ask him if he can find the time to do the same for me on my nano 40 and 30 :D

Regarding the holes - if it was me, I would put another row of holes down the bottom and also another row on the left of the lid and the right, if you see what I mean?

:good: well done though, good job!
 
Shelster said:
Ch4rlie - absolutely bloomin FANTASTIC!!!!!!!
 
Aw shucks, thanks 
blush.png


Shelster said:
My hubby is really good at DIY so I might ask him if he can find the time to do the same for me on my nano 40 and 30
biggrin.png


Yeah, if your husband wants more info on dimensions/measurements or eBay links for the perspex, glue or anything like that, just let me know.
 
Am sure anyone with half decent DIY skills can do a better job than me as am not the most DIY gifted person!
This took me quite a few hours to do, but did do the planning and measurements the previous day so am certain all can be done within a day.
 
 
Shelster said:
Regarding the holes - if it was me, I would put another row of holes down the bottom and also another row on the left of the lid and the right, if you see what I mean?
 
Not entirely sure what you mean but think I get the gist of the idea.
GF does not want too many holes in the new lid, so think for now will add another row of holes and see how that fares.
 
Thanks for your comments 
smile.png
 
Now, stage 6 
happy.png

 
SAM_1081_zpsbfe7666a.jpg

 
Added another row of ventilation holes, there are now 21 x 4mm holes evenly space 1 inch apart. Looks pretty decent have to say.
 
Then did an extra bit of work on the lid
 
30_zps159961d2.jpg

 
29_zpsfb42bdc2.jpg

 
Have added another two piece of perspex at each end that runs parallel to the black perspex divider.
 
 
SAM_1082_zps5b02df3c.jpg

 
This is simply to help with less movement of the lid when opening and closing. A better improvement actually.
 
And below is the actual nano tank setup with blurred pics of Endlers!
 
Cannot see any MTS as they are buried in the substrate.
These only been in there just over a week and already there are baby MTS going about! 
blink.png

In a few weeks time will be adding some shrimps 
laugh.png

SAM_1091_zps9903a63b.jpg

 
Pretty pleased with how this has turned out and the GF is chuffed! 
biggrin.png

 
And for those eagle eyed people, yes, that is a DIY spray bar but thats another story........
 
Someone has been busy, nice job well done
 
msebar said:
Someone has been busy, nice job well done
 
Thanks for the comment 
smile.png

 
Yeah, was a busy day but very satisfying though. 
 
I really do like the new lid now.
Much easier to use and already have done water change today as well, oh, so nice and easy to do a simple water change without faffing about with the old glass lids as of previously. 
 
Recommended or anyone who has a nano tank to do something like this, totally well worth the effort. 
happy.png
 

Most reactions

Back
Top