You've Got Your Tank....what's Next?

The April FOTM Contest Poll is open!
FishForums.net Fish of the Month
🏆 Click to vote! 🏆

Aquascaper

Fish Aficionado
Joined
Jun 23, 2004
Messages
3,399
Reaction score
0
Location
Banchory, Aberdeenshire
Ok, to start with a little history..........I have had 4 marine tanks now and i'm about to start number 5. I started with a 40g then moved to a 56g then back to a 40g then to a 100g and started a 10g Nano. Due to an upcoming project i'm having to break my 100g reef down to a 40g so that it will be a little easier to transport when the time comes. As this 40g is a bare tank I thought it might be useful to someone to have a picture by picture guide of how to build a reef tank from scratch.
I have the massive advantage of having all the supplies I need straight away such as live sand, live rock, inverts and fish so hopefully as long as the bits i've ordered online turn up soon this thread won't take long to finish :D

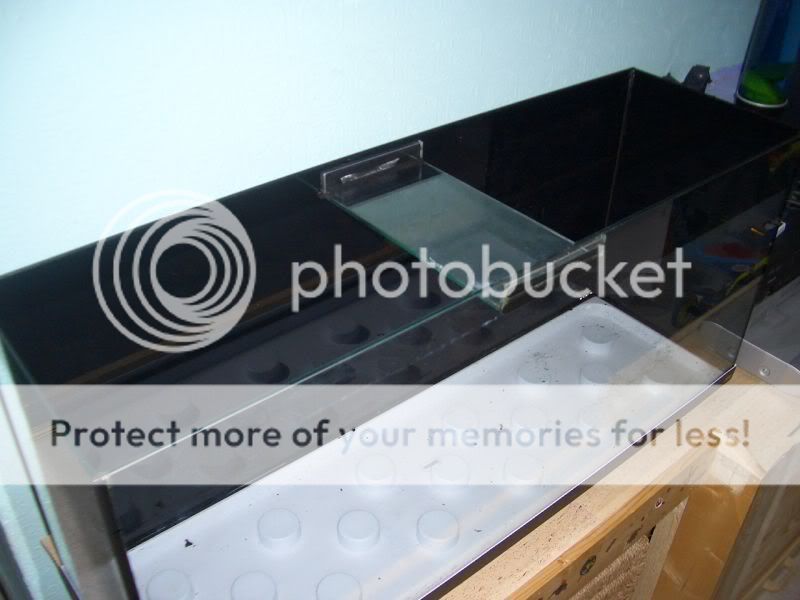
Step 1: Painting the tank back
Some people do some people don't, it's entirely your decision. I personally prefer a coloured background as it hides pipework, electrical cables, etc. behind the tank as well as providing darkness inside the reef structure for the fish and inverts (not to mention cutting down light spillage from the tank). I have tried blue and black and have to say I prefer black as blue tends to look wonderful when clean but really grubby when covered in algae, add to that the fact that black shows up the fish more and I hope you'll agree.

First thing to do is clean the glass that's going to be painted, Use a normal window cleaner and a dry cloth and a razor blade to remove any stuck on bits. when done........paint. If you want to, do the sides as well, it will really depend on where the tank is and how you want to view it.
Painted.jpg
 
Step 2: Drilling The Overflow Hole
I had to ask around for a little advice on this subject as i've never drilled glass before and the advice given was very helpful. To drill a hole in glass you will need either a Dremel type tool with a diamond tip or a diamond tipped hole cutter, I went for the hole cutter option as it gives a better circle and therefore should be a little easier to seal. These bits are quite expensive, mine was £18 off eBay but should be good for a fair number of holes, certainly enough for one tank and a sump.

After measuring up and marking where the hole was going to go I created a jig for the hole cutter to sit in out of an old shelf. The reason for making this is when I practiced on a spare piece of glass the bit shot all over the place and scratched the glass no end before it cut a groove in the glass. The glass bit is 42mm in diameter so I cut a 44mm hole in the wood which left enough room for the drill bit to turn without getting caught.
Jig.jpg


I found the easiest way to drill the hole was to lie the tank on it's front on the coffee table covered with a towel to avoid scratching the front glass. Then I placed the wooden jig on top of the glass and clamped it in place using the girlfriend (you can use normal clamps if you prefer :D ). Once it was held in place I poured some water into the hole in the jig and then lowered the drill bit down. I used an 18v handheld drill with a variable speed trigger to drill with as this gave me total control over the speed of the bit. The key to this is slow and steady with plenty of coolant. Some people suggest that you drill halfway through the glass then start from the other side to complete the hole, as this was a little impractical as the tank was already built I just drilled straight through. The thing to remember if you do it my way is to not put too much pressure on the drill as you go through the other side. Once i'd finished I found I hade taken a nick out of the inside of the glass, nothing to worry about but still.
Hole.jpg

Hole2.jpg


You'll notice I have drilled my hole in the centre of the tank, this is because I am only having one overflow @ 1 1/4" which is plenty for a tank this size and it will be easier to hide in the middle than over on one side. Again, where you put yours and how many you put in will be entirely down to your own design.

With regards to the actual overflow system I have had several ideas and had to redesign quite a few times. My original idea was to have a 90 degree angle facing down enclosed in a 'V' of glass. This would act the same as a Durso standpipe and help to reduce noise and the 'V' shape would make it easy to pile rock against. I ditched this idea as the 'V' would be too big. My second idea was just a straight box design with the same 90 degree angle facing down inside but after measuring it all up the box would have been too large to hide so this idea was ditched too. I have finally settled on a standard box design but using all glass and no 90 degree angled pipework. This means that the box will only be 3 1/2" x 2 1/2" x 2", easily hidden by rock but still big enough to allow a decent flow.
Overflow.jpg
 
is that it?

lol! How long did it last take you to set up your marine tank? A day? :lol: ;)

Great work though! Love the design, exept one thing. Wont the central brace be in the way of any urgent, or simple maintenance on your overflow box? I would have thought it would be better placed else where, even though you want to hide it. Maybe use euro bracing instead of a central brace? I guess you know what your doin! :) :p
 
Can't really do a lot at the moment as i'm waiting for plumbing parts to arrive before I can carry on.
As for the overflow box situation, I will be able to gain acess to the overflow by removing the pipe at the back of the tank if needed and there will be traps fitted to stop anything from falling down.......yes its a slight risk and may cause a little hassle later on but what SW tank isn't hassle? I can't think of any reason why the overflow would become blocked, I know it won't leak so i'm pretty confident it'll be alright :D

I have considered using two smaller braces rather than the wide central one but I haven't really decided whether it's worth it or not yet.
 
sorry didn't meen to sound rude!!

It's just some people doc there tank then post. Some post as they go and I was trying to establish in wich catigory you fell??

I'm currentley doing my own however I'm waiting till I'm nerly all the way donew to post ( building the stand and building the sump so's gona b a long topic me thinks!!
 
Are you adding a closed loop? Why or why not?

I was just wondering since you are drilling it anyway, why not drill it for a closed loop as well?
 
The whole reason behind down-sizing to a tank this size is that it needs to be more portable. I've drilled the back of the tank and not to bottom for this precise reason. Drilling more holes in the back is impractical and wouldn't look nice IMO and adding a closed loop is too much hassle and would limit where the tank could be positioned in the future.

There will be plenty of flow in there with the two Seio's and the sump return anyway :D
 
You don't nesserseraly need to drill the tank for a closed loop! you could have 20mm hard plumed closed loop as a sigle unit with a flow out of the tank over the side to the pump and then to a tee and back to the tank at each side ( seen it somewhere see if I can't find the link)

This way it's very portable you can juse drain it and 'pick' it out of the tank!

What do you think?

Clossed loop for undrilled tank


Found the link
 
That's similar to the 5000lph closed loop system I have in my 100g reef at the moment except that my pump is hidden in the tank behind the live rock so that it draws water through the live rock and prevents dead spots in the reef wall.

As this new tank is only 12" wide I can't afford to fill the tank with unnecessary pipework and I really don't think that adding a closed loop is going to provide that much more benefit, especially when there will be around 10,000lph flow in there anyway (The tank + sump is around 250 litres combined so that's a theorectical turnover of about x40)

Update:

The plumbing parts have been dispatched so I should have them by the start of next week :D
The only problem is that i'm away in Budapest next weekend so won't be able to do much in the next two weeks :X
 
Just a note too, IME (with plexiglass anyway), if you clamp another piece of wood on the underside of the glass when you drill it, it shouldn't chip when the bit comes through. I have never tried it with glass but when I have drilled acrylic it helps to keep it from burring and making a clean cut.
 
Very good point crazyelece :thumbs:

I did indeed chip the glass on the exit side of the tank :X Still, lesson learnt.........another way to avoid it with glass is to drill halfway through the glass then change sides and drill from the other side (so i'm told). This was impractical for me due to the way the tank is built and where I wanted the hole.

Ok, well my plumbing parts have arrived (well done to fish, fur & feathers) so I can now get the bulkhead in and start to construct the overflow box.

The bulkhead is a 43mm/32mm and shouldgive plenty of drainage for the size of tank:
CIMG0028.jpg

and in place on the back glass:
CIMG0029.jpg


Point to note: n Never overtighten the bulkhead as you risk shattering the glass, it is recommended to tighten till hand tight then 1/4 turn after that.
 
These have to be the most annoying powerheads to attach i've ever come across...there's so much weight they keep falling off :grr:
Powerheads.jpg

I know that when the tanks full that will help but it's still annoying!
 
What type of powerheads are those? What flow rating? They look very good for non linear flow. Also if you put a small dot of superglue gel or silicone on the suction cups it helps keep them there, but is still able to be pulled off later.

Also I added that little note because it is impractical to drill on both sides on many tanks for one reason or another. Take a 55 gal, your never going to fit the drill in the inside since its only about a foot wide.
 

Most reactions

trending

Staff online

Members online

Back
Top