Hello,
Modern electronic ballasts will normally shut down under fault conditions. You next have to determine that your tubes are actually O.K.
Tubes can fail in **really** weird ways.. but you'll normally only see weird visual effects with traditional magnetic ballasts.
Have a look at your tubes... Do the ends of the tubes look slightly blackened on the glass.. ?
It is possible that the tubes are at the end of their useful life. A problem with your old ballast could have accelerated their demise.
Check your wiring connections... tug the wires at the ballast connections gently.. A sound connection will not disconnect easily.
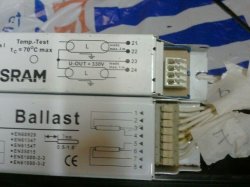
Double check and check again that each wire from the tubes goes to the correct connection on the ballast. As said above, connection No. 3 goes to the common connection to both tubes.
If you think that the wiring might be incorrect then just ask and I'll talk you through testing and proving the wiring.
How much wire insulation did you strip off before you made the connections?
Assuming that your ballast wiring is O.K. now have a look at the pins on the end of the tubes.. these should have no trace of corrosion on them.. if they do, then it is possible that you have a poor connection in one or more of the lamp sockets.
I assume that you have checked the obvious... poor connections in the mains plug? also check that the fuse is secure in the plug.
Do you have access to any other tubes to test in your sockets?.. or any other lighting which takes the same size tube as the tank?
How did you diagnose the original problem with the old ballast and how did the fault first show up?
The more information the better...
Bodge99.
Modern electronic ballasts will normally shut down under fault conditions. You next have to determine that your tubes are actually O.K.
Tubes can fail in **really** weird ways.. but you'll normally only see weird visual effects with traditional magnetic ballasts.
Have a look at your tubes... Do the ends of the tubes look slightly blackened on the glass.. ?
It is possible that the tubes are at the end of their useful life. A problem with your old ballast could have accelerated their demise.
Check your wiring connections... tug the wires at the ballast connections gently.. A sound connection will not disconnect easily.
Double check and check again that each wire from the tubes goes to the correct connection on the ballast. As said above, connection No. 3 goes to the common connection to both tubes.
If you think that the wiring might be incorrect then just ask and I'll talk you through testing and proving the wiring.
How much wire insulation did you strip off before you made the connections?
Assuming that your ballast wiring is O.K. now have a look at the pins on the end of the tubes.. these should have no trace of corrosion on them.. if they do, then it is possible that you have a poor connection in one or more of the lamp sockets.
I assume that you have checked the obvious... poor connections in the mains plug? also check that the fuse is secure in the plug.
Do you have access to any other tubes to test in your sockets?.. or any other lighting which takes the same size tube as the tank?
How did you diagnose the original problem with the old ballast and how did the fault first show up?
The more information the better...
Bodge99.

 /s1101.photobucket.com/user/chives1231/media/SAM_0176.jpg.html?sort=3&o=0
 /s1101.photobucket.com/user/chives1231/media/SAM_0175.jpg.html?sort=3&o=1
 /s1101.photobucket.com/user/chives1231/media/SAM_0173.jpg.html?sort=3&o=2
 /s1101.photobucket.com/user/chives1231/media/SAM_0171.jpg.html?sort=3&o=3
 /www.ebay.co.u...=item3380eebd2a
") I just didnt like the idea of the new ballast having less connections than the old and not knowing how to wire them.
I just didnt like the idea of the new ballast having less connections than the old and not knowing how to wire them.
