You are using an out of date browser. It may not display this or other websites correctly.
You should upgrade or use an alternative browser.
You should upgrade or use an alternative browser.
Juwel Monolux 80 Ballast
- Thread starter Murpman79
- Start date
The December FOTM Contest Poll is open!

🏆 Click to vote! 🏆
Hello,
No need to have the specific ballast model for replacement purposes...
All you need is
The tube sizes and ratings (e.g. 2x30W T8) EDIT: this one appears to be 1x18W T?... can you confirm??)
How many wires connect to the ballast (ignoring the mains connections). ?
Does the hood have a starter fitted?
How much space is available for the ballast?
This info will help with ballast replacement decisions...
Bodge99
No need to have the specific ballast model for replacement purposes...
All you need is

The tube sizes and ratings (e.g. 2x30W T8) EDIT: this one appears to be 1x18W T?... can you confirm??)
How many wires connect to the ballast (ignoring the mains connections). ?
Does the hood have a starter fitted?
How much space is available for the ballast?
This info will help with ballast replacement decisions...
Bodge99
Hi thanks bodge
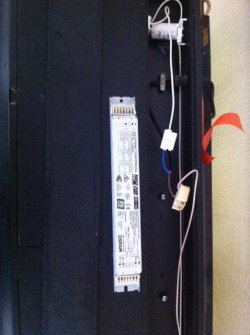
It is for t8 bulbs the hood does have a starter, it has a wire from the starter to each end of the hood so two wires. Then a wire from both ends one connecting to the neutral power feed and the other end it goes into a connector block on its own terminal with the live power feed next to it on its own terminal which then connected to the ballasts . I hope that makes a bit of sense ??
Sorry forgot sizes, the space left could take upto 400mm length by 50mm max wide and 40 mm deep for the ballast .
Hello,
The presence of a starter indicates that a magnetic ballast is/was fitted. These are generally pretty reliable. You normally get problems with either the tube(s) or with the starter. Bad connections are possible, normally due to moisture induced corrosion.
As you don't have the original ballast the original problem is somewhat moot...
You can use any ballast which is rated for your tube and will fit into the space available.
Now might be a good time to consider an electronic ballast. Advantages include lower overall running costs (more efficient), tube monitoring (tube end of life detection and fault detection etc.) and simpler wiring (no starter required).
So... you need a 1x18W T8 ballast. (PLEASE correct me if my assumption about the tube power/number of tubes is incorrect.. this is important to get right!)
A quick look at Ebay.. The cheapest (at this time):
http /www.ebay.co.uk/itm/OSRAM-1-x-18w-2ft-600mm-T8-HIGH-FREQUENCY-ELECTRONIC=-BALLAST-/251322410210?pt=UK_BOI_Lights_Lighting_ET&hash=item3a83fba4e2 £4.65 and £3.75 p+p
Dimensions are 360mm x 30mm x 29mm
The mains connects to one end and the other 4 wires (from the tube) connect to the other, as per the schematic which is printed on the ballast housing.
Don't forget to remove the starter and its associated wiring as this is not required for an electronic ballast.
If you need any help connecting up or have any questions at all then please post here. There is no such thing as a silly question when working with electricity, so please don't hesitate. Nobody is born knowing this stuff.. but it really is easy.
Look forward to hearing about your progress...
Good luck!
Bodge99.
The presence of a starter indicates that a magnetic ballast is/was fitted. These are generally pretty reliable. You normally get problems with either the tube(s) or with the starter. Bad connections are possible, normally due to moisture induced corrosion.
As you don't have the original ballast the original problem is somewhat moot...
You can use any ballast which is rated for your tube and will fit into the space available.
Now might be a good time to consider an electronic ballast. Advantages include lower overall running costs (more efficient), tube monitoring (tube end of life detection and fault detection etc.) and simpler wiring (no starter required).
So... you need a 1x18W T8 ballast. (PLEASE correct me if my assumption about the tube power/number of tubes is incorrect.. this is important to get right!)
A quick look at Ebay.. The cheapest (at this time):
http
 /www.ebay.co.uk/itm/OSRAM-1-x-18w-2ft-600mm-T8-HIGH-FREQUENCY-ELECTRONIC=-BALLAST-/251322410210?pt=UK_BOI_Lights_Lighting_ET&hash=item3a83fba4e2 £4.65 and £3.75 p+p
Dimensions are 360mm x 30mm x 29mm
The mains connects to one end and the other 4 wires (from the tube) connect to the other, as per the schematic which is printed on the ballast housing.
Don't forget to remove the starter and its associated wiring as this is not required for an electronic ballast.
If you need any help connecting up or have any questions at all then please post here. There is no such thing as a silly question when working with electricity, so please don't hesitate. Nobody is born knowing this stuff.. but it really is easy.
Look forward to hearing about your progress...
Good luck!
Bodge99.
As an eBay Associate we earn from qualifying purchases.
Thanks for the info bodge and the ebay link
Unfortunately that ballast is too long as its 600 mm it won't fit.
Would this work ?
http /bit.ly/14Wtdfn
Unfortunately that ballast is too long as its 600 mm it won't fit.
Would this work ?
http
 /bit.ly/14Wtdfn
Hello,
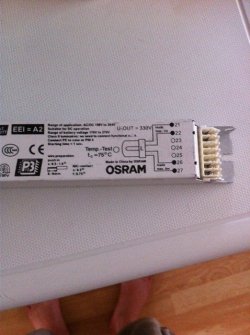
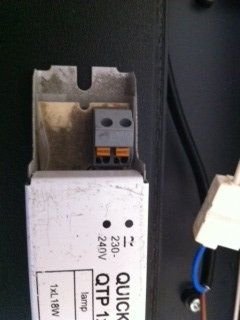
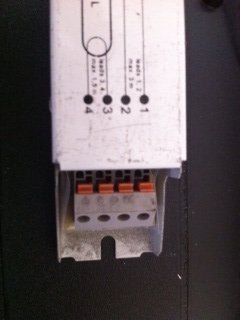
It would appear that you may have the wrong ballast. The picture is a little unclear, but this one appears to be for a compact fluorescent lamp (CFL)/twin PL (http /www.ebay.co.uk/itm/Aquarium-Fish-Tank-Light-Bulb-Twin-PL-Tube-18w-24w-Fits-Some-Aqua-One-Tanks-/121182624433?pt=UK_Pet_Supplies_Fish&var=420175160208&hash=item1c370c1ab1) and NOT a T8. This ballast is different from the one indicated in the Ebay listing.
Is the part number QTP8DL or QT8 DL ??
A clearer photo or two of the schematic and part number would help...
Bodge99
It would appear that you may have the wrong ballast. The picture is a little unclear, but this one appears to be for a compact fluorescent lamp (CFL)/twin PL (http
 /www.ebay.co.uk/itm/Aquarium-Fish-Tank-Light-Bulb-Twin-PL-Tube-18w-24w-Fits-Some-Aqua-One-Tanks-/121182624433?pt=UK_Pet_Supplies_Fish&var=420175160208&hash=item1c370c1ab1) and NOT a T8. This ballast is different from the one indicated in the Ebay listing.
Is the part number QTP8DL or QT8 DL ??
A clearer photo or two of the schematic and part number would help...
Bodge99
As an eBay Associate we earn from qualifying purchases.
Hello,
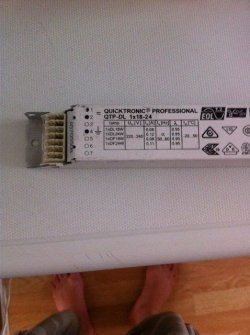
Thanks very much for the photos.. this really does help a lot.
Sorry to say, but this is certainly the incorrect ballast for a T8. The Osram datasheets give this: http /www.osram.com/osram_com/products/lamps/compact-fluorescent-lamps/osram-dulux-l/osram-dulux-l-xt/index.jsp?productId=ZMP_1014117
as a suggested supported lamp.... exactly as I feared.
I suggest that you contact the seller and tell them that they have sent you the wrong ballast... I bet it was just a simple mistake on their part...
Sorry for the bad news..
I'll certainly give assistance when you want/need it... if you would like a quick "heads up" now, then just ask and I'll write something up tonight for you..
BTW. QTP-DL 1x18-24 means that this ballast supports an 18W or 24W twin PL tube (more properly "lamp", but I prefer "tube") of the type indicated above.
QTP simply means "Quicktronic Professional", a specific Osram designation.
Bodge99
Thanks very much for the photos.. this really does help a lot.
Sorry to say, but this is certainly the incorrect ballast for a T8. The Osram datasheets give this: http
 /www.osram.com/osram_com/products/lamps/compact-fluorescent-lamps/osram-dulux-l/osram-dulux-l-xt/index.jsp?productId=ZMP_1014117
as a suggested supported lamp.... exactly as I feared.
I suggest that you contact the seller and tell them that they have sent you the wrong ballast... I bet it was just a simple mistake on their part...
Sorry for the bad news..
I'll certainly give assistance when you want/need it... if you would like a quick "heads up" now, then just ask and I'll write something up tonight for you..
BTW. QTP-DL 1x18-24 means that this ballast supports an 18W or 24W twin PL tube (more properly "lamp", but I prefer "tube") of the type indicated above.
QTP simply means "Quicktronic Professional", a specific Osram designation.
Bodge99
Hello,
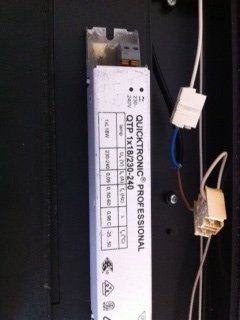
Glad to see that you have another ballast...
Now to connect up.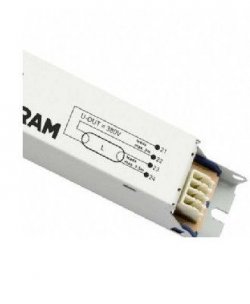
This image is from another ballast...note that the terminal numbers are different. Just for info.
Anyway, If you look at your hood wiring you will see 2 wires from each tube socket.
Disconnect/cut any existing connections (NOT at the tube sockets, obviously!) leaving the maximum length of wire possible.
Totally remove the starter wiring as this is no longer required.
What you should be left with is 2 lengths of wire from each tube socket. Hopefully you will have enough length to reach the ballast connections. If you don't, then you'll have to extend the wiring so that you do.
Use solid core wire for this.. You can use 1mm diameter lighting cable (strip off the outer cable sheath and use the inner insulated cores.. NOT the earth wire). Your local DIY shop should sell this by the metre.
Either solder the wires together and use heatshrink tubing to insulate the joint or use a connector block as required.
If you look at the wiring schematic you will see the oval marked "L". This represents the actual lamp. At either end you will see 2 lines representing the tube wiring. The semicircles at the end of the lamp symbol (connected to 1 and 2, 3 and 4) represents the tube heaters (lamp filaments).
All you need to do is to connect one of the tube socket pairs to 1 and 2. (i.e. one wire to terminal 1, the other wire to terminal 2). You can use either pair of wires. It also doesn't matter which of the pair goes to terminal 1.
Now connect the other tube socket. Connect one wire to terminal 3 and the last wire to terminal 4.
As before, it doesn't matter which of the pair connects to terminal 3.
Normally, you need to remove about 5-8mm of insulation from the wires to make the actual connection. It would appear that your ballast terminals are either a spring loaded lever type or a "push the wire in" type.
Now make the mains connections.... Some people "tin" the mains wires before making the connection. (strip off an inch or so of insulation from both the live and neutral wires, twist the strands to give a solid core... solder to make them "solid".. cut to length and terminate).
Not essential..I just do it out of habit.
Before you plug in and test, ensure that the connections are sound by **GENTLY** tugging on each wire in turn. A sound connection will not pull out easily.
Refit the tube. Now place the hood somewhere where any heat will not damage anything..
Plug in and turn on (don't forget any inline switch).
If all is well, the tube will light. Leave it lit for an hour. Switch off and **UNPLUG**.
Check the ballast case for excessive heat. **ASSUME** that it is HOT (don't want to burn yourself!!).
If everything is OK, then you will probably find it slightly warm.
If you are happy with everything, rebuild the hood and refit to the tank...
Well done!!
Any questions or problems... just post here.
Good luck!!
Bodge99
Glad to see that you have another ballast...
Now to connect up.

This image is from another ballast...note that the terminal numbers are different. Just for info.
Anyway, If you look at your hood wiring you will see 2 wires from each tube socket.
Disconnect/cut any existing connections (NOT at the tube sockets, obviously!) leaving the maximum length of wire possible.
Totally remove the starter wiring as this is no longer required.
What you should be left with is 2 lengths of wire from each tube socket. Hopefully you will have enough length to reach the ballast connections. If you don't, then you'll have to extend the wiring so that you do.
Use solid core wire for this.. You can use 1mm diameter lighting cable (strip off the outer cable sheath and use the inner insulated cores.. NOT the earth wire). Your local DIY shop should sell this by the metre.
Either solder the wires together and use heatshrink tubing to insulate the joint or use a connector block as required.
If you look at the wiring schematic you will see the oval marked "L". This represents the actual lamp. At either end you will see 2 lines representing the tube wiring. The semicircles at the end of the lamp symbol (connected to 1 and 2, 3 and 4) represents the tube heaters (lamp filaments).
All you need to do is to connect one of the tube socket pairs to 1 and 2. (i.e. one wire to terminal 1, the other wire to terminal 2). You can use either pair of wires. It also doesn't matter which of the pair goes to terminal 1.
Now connect the other tube socket. Connect one wire to terminal 3 and the last wire to terminal 4.
As before, it doesn't matter which of the pair connects to terminal 3.
Normally, you need to remove about 5-8mm of insulation from the wires to make the actual connection. It would appear that your ballast terminals are either a spring loaded lever type or a "push the wire in" type.
Now make the mains connections.... Some people "tin" the mains wires before making the connection. (strip off an inch or so of insulation from both the live and neutral wires, twist the strands to give a solid core... solder to make them "solid".. cut to length and terminate).
Not essential..I just do it out of habit.
Before you plug in and test, ensure that the connections are sound by **GENTLY** tugging on each wire in turn. A sound connection will not pull out easily.
Refit the tube. Now place the hood somewhere where any heat will not damage anything..
Plug in and turn on (don't forget any inline switch).
If all is well, the tube will light. Leave it lit for an hour. Switch off and **UNPLUG**.
Check the ballast case for excessive heat. **ASSUME** that it is HOT (don't want to burn yourself!!).
If everything is OK, then you will probably find it slightly warm.
If you are happy with everything, rebuild the hood and refit to the tank...
Well done!!
Any questions or problems... just post here.
Good luck!!
Bodge99
Similar threads
- Replies
- 2
- Views
- 623
- Replies
- 5
- Views
- 343

