SRC
Some days even my lucky rocketship underpants won'
I have seen several people who complain about not knowing how to re-size their huge pictures to post online (on forums mainly). I see more people complain about pictures that are posted being way too big.
You don’t have to purchase expensive photo-editing software to accomplish this feat, it’s as simple as using the Paint program that came with your Windows software. Yes, it’s that simple...everyone has the program that will allow you to do it!!!!!
Some people don’t/didn't realize this and some people do/did, and some people knew and still didn’t know how to accomplish this….I’m going to walk you through how to do it..it’s actually quite simple.
This is going to be broken into 3 sets of directions.
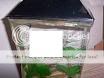
Set 1, will instruct you on how to resize your picture completely (i.e. you want to post a picture of your entire fish tank). Easy process, anyone can do this with little problem.
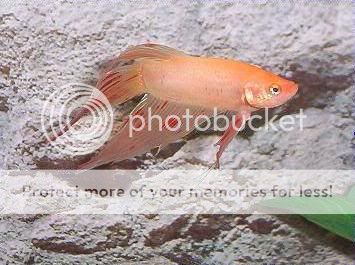
Set 2, will instruct you on how to remove a portion of your photo (i.e. you want to crop an area from within a picture). Medium process, may take some practice.
Set 3, will instruct you on re-sizing a picture to a specific size (i.e. like for the avatar and signature guidelines). Hard process, may take several attempts.
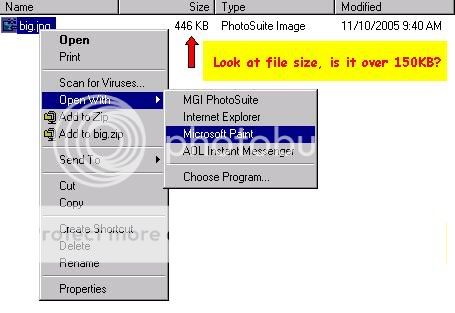
Please note, when you look at your file size, that any picture over 150 KB really needs to be re-sized to post on a forum. The parameters of these photos are too large to post without taking up the entire page. Which usually means:
1. People can’t tell exactly what they are looking at…without scrolling the screen in several directions.
2. People with Dial-up, or slower DSL/cable connections have to wait indefinite amounts of time, for the pic to load..if it ever does load (after a while some PC’s/connections will time out and the pic will never fully load up).
3. Many people won’t bother with these huge pics…so that means they don’t look at your photos, which means you wasted your time and a pretty picture.
4. It takes up unnecessary, excessive bandwidth for whoever is hosting the picture.
Re-sizing solves all these problems.
So keep in mind..if your photo file size is over 150KB you really should re-size it some.
There are exceptions, where people have a photo that needs to be larger to show detail, but 9 times out of 10..the picture should have/could have been resized and the viewers would still be able to recognize what they are looking at.
Ok….
Instructions 1. Resizing an entire photo in MS PAINT:
Step one.
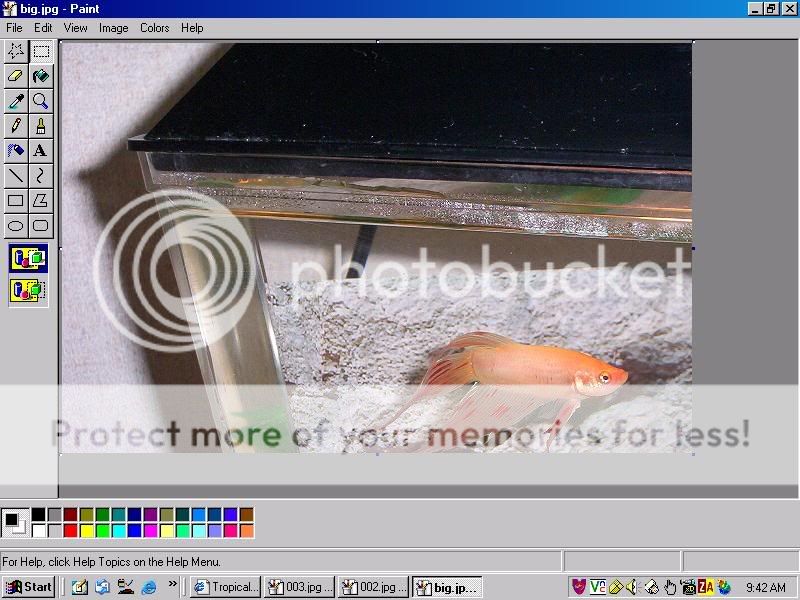
Find your file (i.e. big.jpg)
Right click
Scroll to “open with..”
Left click, to choose this option.
Your photo should now have opened in the MS Paint program.

Step two.
Click the IMAGE tab in the menu bar (up at the top)
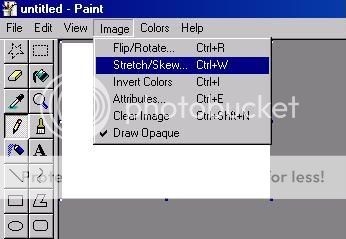
Step three.
Scroll down to STRETCH/SKEW
Step four:
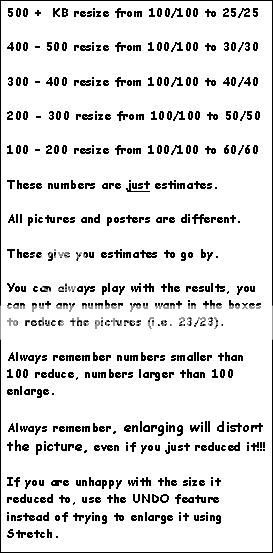
Change the 100/100 in the STRETCH section (you may have to play with this to get the photo to a comfortable viewing size).

Your photo will automatically change its size and show up on the screen.

Note: (still too big? Way too little?)
If you don’t like how it looks you can UNDO it, by pressing CNTRL and Z at the same time.
Note: Don't reduce twice in a row! If the photo is not the size you wanted (i.e. it's still not small enough) don't reduce again, this will alter the quality of your photo SEVERELY..always use the UNDO feature to return the photo to its original size, then reduce again to a smaller size then previously tried.
Note: You can use the UNDO feature 3 times (i.e. you can undo the 3 things you did previous) but that's as far back as you can go. You can undo after you save, as long as you did not close the file, just use the UNDO feature then re-save. You cannot undo anything once you close the program.
Step five:
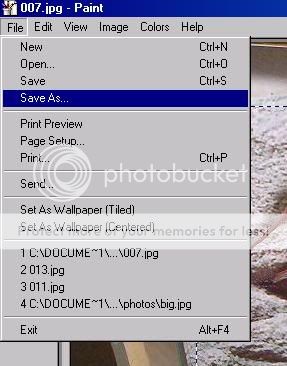
Save your photo.
If you are happy with the size save your photo. You may want to use the SAVE AS option, in case you ever wanted to go back to your original photo.
YOU’RE DONE!!!!!
*************************************************************************
Instructions 2. Resizing and cropping in MS PAINT:
Step one.
Find your file (i.e. big.jpg)
Right click
Scroll to “open with..”
Left click, to choose this option. (your photo should now open in the MS Paint program)
Step two.
Decide if the photo area you want to crop is too large (sometimes it will appear slightly blurry if it is too big, resizing some will lessen the distortion).
If it needs resizing do this, but don’t re-size to the same size you would if you were re-sizing to put the entire picture in a post
Click the IMAGE tab in the menu bar (up at the top)
Scroll down to STRETCH/SKEW.
only resize until the area you want is a manageable size.
Step three.
Move the screen around and decide what area you want to crop.
Look to your left, in the TOOLBAR and find the dotted line Box (there is also a dotted line Star, that is for free form cutting…harder to use).
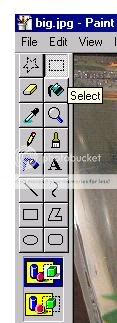
Move the cursor out onto the picture.
Find the area you want to crop.
With your mouse, click (either button will work) the button and drag it, you will see a dotted line box appear. The section inside the box is the area that you are cropping OUT…this is the part of the photo you want to use as a NEW picture. When you have the area you want inside the dotted line box let go of the button.
Note: Don’t click anywhere else on the picture once you’ve drawn your box and let go of the mouse button..or the box will go away and you will have to redraw the box.
Step four.
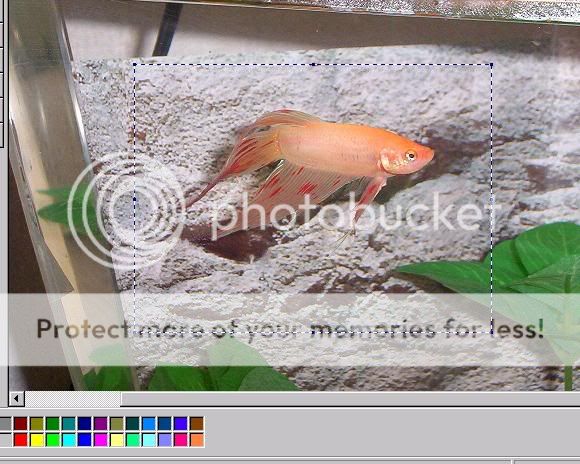
Put your cursor inside the box and right click.
From the menu that pops up scroll to CUT, click it.

The photo will disappear. Don’t be alarmed.
Step five.
Click the IMAGE tab in the menu bar (up at the top)
Step six.
Scroll down to STRETCH/SKEW
Step seven:
Change the 100/100 in the STRETCH section to 10/10.
This will reduce the entire picture to a very small size on the screen.
Step eight.
Put the cursor on the screen.
Right click.
From the menu that pops up choose PASTE.
Your picture should re-appear on the screen.
Step nine.
Save your photo.
You may want to use the SAVE AS option, in case you ever wanted to go back to your original photo.
YOU’RE DONE!!!!!
*************************************************************************
Instructions 3. Resizing a photo to a specific size in MS PAINT:
Step one.
Find your file (i.e. big.jpg)
Right click
Scroll to “open with..”
Left click, to choose this option.
(your photo should now have opened in the MS Paint program)
Step two.
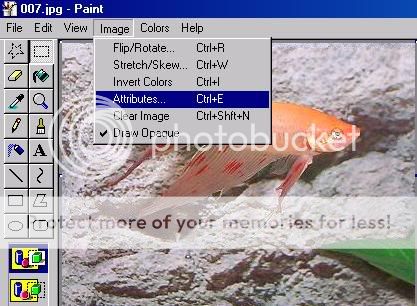
Click the IMAGE tab in the menu bar (up at the top)
Step three.
Scroll down to ATTRIBUTES
Step four.
This will tell you the Length and Width of your photo.
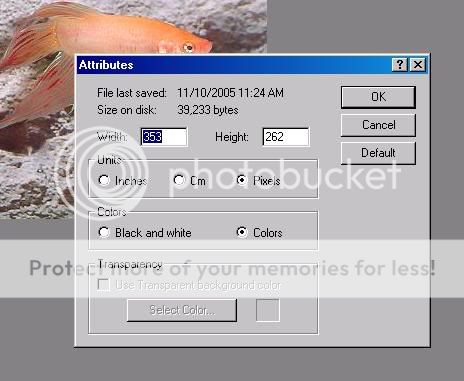
If you need your picture to be 120 x 120 and your photo is 353 x 262 you will have to reduce it to get it to a size comparable to the required size.
Step five.
Click OK and exit that screen. (this will return you to your photo).
Click the IMAGE tab in the menu bar (up at the top)
Scroll down to STRETCH/SKEW
You will have to play with this until it is right (just remember to use the UNDO feature if the size isn't right EACH time).
You have to determine also if you want the photo to remain exactly the same and be reduced, or can any excess be trimmed off to make the photo smaller before reducing.
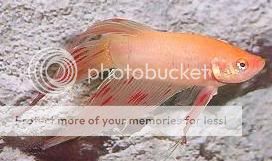
Example: This photo needs to be exact, no excess trimmed off. The photo is 353 x 262. We will reduce from 100/100 to 33/33. That reduced the picture to a size of 117 x 86.

I am now compliant with the 120 x 120 limitation.
Note: After you reduce once go back to ATTRIBUTES and check the size. If it is not small enough click OK, use UNDO and then reduce again. Repeat these steps until it is the size you need/want.
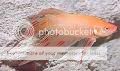
Keep in mind that if the picture is getting too small you may need to trim it down some. This keeps the actual photo from becoming too small. When reducing to an exact size (especially smaller sizes) trim down as much unnecessary edges (using the dotted line box).
Example: Here I trimmed off the excess of the same picture. The original size was 353 x 262, after trimming off the unnecessary edges it was reduced to 272 x 161 (still retaining the original size at this point)
353 x 262
272 x 161
Now reducing this cropped version down to 120 x 120, we reduce from 100/100 to 44/44 and get a photo that is 120 x 71.
You will notice how the "focus" of the picture is now larger then before, due to trimming off the "excess" areas around it.
353 x 262 (complete picture reduced)
117 x 180
272 x 161 (cropped picture reduced)
 120 x 161
You retain much more of the intended area and it remains much larger and more pronounced.
Step six.
Save your photo.
You may want to use the SAVE AS option, in case you ever wanted to go back to your original photo.
YOU’RE DONE!!!!!
*************************************************************************
I hope this helps you. You shouldn't have any problems, it seems like alot of steps, but once you've done it once or twice it's a breeze. Just always be sure to save the edited photo as something else, in case you made a goof or don't like it once it's done. Otherwise you're stuck with it.
You don’t have to purchase expensive photo-editing software to accomplish this feat, it’s as simple as using the Paint program that came with your Windows software. Yes, it’s that simple...everyone has the program that will allow you to do it!!!!!
Some people don’t/didn't realize this and some people do/did, and some people knew and still didn’t know how to accomplish this….I’m going to walk you through how to do it..it’s actually quite simple.
This is going to be broken into 3 sets of directions.
Set 1, will instruct you on how to resize your picture completely (i.e. you want to post a picture of your entire fish tank). Easy process, anyone can do this with little problem.
Set 2, will instruct you on how to remove a portion of your photo (i.e. you want to crop an area from within a picture). Medium process, may take some practice.
Set 3, will instruct you on re-sizing a picture to a specific size (i.e. like for the avatar and signature guidelines). Hard process, may take several attempts.
Please note, when you look at your file size, that any picture over 150 KB really needs to be re-sized to post on a forum. The parameters of these photos are too large to post without taking up the entire page. Which usually means:
1. People can’t tell exactly what they are looking at…without scrolling the screen in several directions.
2. People with Dial-up, or slower DSL/cable connections have to wait indefinite amounts of time, for the pic to load..if it ever does load (after a while some PC’s/connections will time out and the pic will never fully load up).
3. Many people won’t bother with these huge pics…so that means they don’t look at your photos, which means you wasted your time and a pretty picture.
4. It takes up unnecessary, excessive bandwidth for whoever is hosting the picture.
Re-sizing solves all these problems.
So keep in mind..if your photo file size is over 150KB you really should re-size it some.
There are exceptions, where people have a photo that needs to be larger to show detail, but 9 times out of 10..the picture should have/could have been resized and the viewers would still be able to recognize what they are looking at.
Ok….
Instructions 1. Resizing an entire photo in MS PAINT:
Step one.
Find your file (i.e. big.jpg)
Right click
Scroll to “open with..”
Left click, to choose this option.
Your photo should now have opened in the MS Paint program.
Step two.
Click the IMAGE tab in the menu bar (up at the top)
Step three.
Scroll down to STRETCH/SKEW
Step four:
Change the 100/100 in the STRETCH section (you may have to play with this to get the photo to a comfortable viewing size).
Your photo will automatically change its size and show up on the screen.
Note: (still too big? Way too little?)
If you don’t like how it looks you can UNDO it, by pressing CNTRL and Z at the same time.
Note: Don't reduce twice in a row! If the photo is not the size you wanted (i.e. it's still not small enough) don't reduce again, this will alter the quality of your photo SEVERELY..always use the UNDO feature to return the photo to its original size, then reduce again to a smaller size then previously tried.
Note: You can use the UNDO feature 3 times (i.e. you can undo the 3 things you did previous) but that's as far back as you can go. You can undo after you save, as long as you did not close the file, just use the UNDO feature then re-save. You cannot undo anything once you close the program.
Step five:
Save your photo.
If you are happy with the size save your photo. You may want to use the SAVE AS option, in case you ever wanted to go back to your original photo.
YOU’RE DONE!!!!!
*************************************************************************
Instructions 2. Resizing and cropping in MS PAINT:
Step one.
Find your file (i.e. big.jpg)
Right click
Scroll to “open with..”
Left click, to choose this option. (your photo should now open in the MS Paint program)
Step two.
Decide if the photo area you want to crop is too large (sometimes it will appear slightly blurry if it is too big, resizing some will lessen the distortion).
If it needs resizing do this, but don’t re-size to the same size you would if you were re-sizing to put the entire picture in a post
Click the IMAGE tab in the menu bar (up at the top)
Scroll down to STRETCH/SKEW.
only resize until the area you want is a manageable size.
Step three.
Move the screen around and decide what area you want to crop.
Look to your left, in the TOOLBAR and find the dotted line Box (there is also a dotted line Star, that is for free form cutting…harder to use).
Move the cursor out onto the picture.
Find the area you want to crop.
With your mouse, click (either button will work) the button and drag it, you will see a dotted line box appear. The section inside the box is the area that you are cropping OUT…this is the part of the photo you want to use as a NEW picture. When you have the area you want inside the dotted line box let go of the button.
Note: Don’t click anywhere else on the picture once you’ve drawn your box and let go of the mouse button..or the box will go away and you will have to redraw the box.
Step four.
Put your cursor inside the box and right click.
From the menu that pops up scroll to CUT, click it.
The photo will disappear. Don’t be alarmed.
Step five.
Click the IMAGE tab in the menu bar (up at the top)
Step six.
Scroll down to STRETCH/SKEW
Step seven:
Change the 100/100 in the STRETCH section to 10/10.
This will reduce the entire picture to a very small size on the screen.
Step eight.
Put the cursor on the screen.
Right click.
From the menu that pops up choose PASTE.
Your picture should re-appear on the screen.
Step nine.
Save your photo.
You may want to use the SAVE AS option, in case you ever wanted to go back to your original photo.
YOU’RE DONE!!!!!
*************************************************************************
Instructions 3. Resizing a photo to a specific size in MS PAINT:
Step one.
Find your file (i.e. big.jpg)
Right click
Scroll to “open with..”
Left click, to choose this option.
(your photo should now have opened in the MS Paint program)
Step two.
Click the IMAGE tab in the menu bar (up at the top)
Step three.
Scroll down to ATTRIBUTES
Step four.
This will tell you the Length and Width of your photo.
If you need your picture to be 120 x 120 and your photo is 353 x 262 you will have to reduce it to get it to a size comparable to the required size.
Step five.
Click OK and exit that screen. (this will return you to your photo).
Click the IMAGE tab in the menu bar (up at the top)
Scroll down to STRETCH/SKEW
You will have to play with this until it is right (just remember to use the UNDO feature if the size isn't right EACH time).
You have to determine also if you want the photo to remain exactly the same and be reduced, or can any excess be trimmed off to make the photo smaller before reducing.
Example: This photo needs to be exact, no excess trimmed off. The photo is 353 x 262. We will reduce from 100/100 to 33/33. That reduced the picture to a size of 117 x 86.
I am now compliant with the 120 x 120 limitation.
Note: After you reduce once go back to ATTRIBUTES and check the size. If it is not small enough click OK, use UNDO and then reduce again. Repeat these steps until it is the size you need/want.
Keep in mind that if the picture is getting too small you may need to trim it down some. This keeps the actual photo from becoming too small. When reducing to an exact size (especially smaller sizes) trim down as much unnecessary edges (using the dotted line box).
Example: Here I trimmed off the excess of the same picture. The original size was 353 x 262, after trimming off the unnecessary edges it was reduced to 272 x 161 (still retaining the original size at this point)
353 x 262
272 x 161
Now reducing this cropped version down to 120 x 120, we reduce from 100/100 to 44/44 and get a photo that is 120 x 71.
You will notice how the "focus" of the picture is now larger then before, due to trimming off the "excess" areas around it.
353 x 262 (complete picture reduced)
272 x 161 (cropped picture reduced)
You retain much more of the intended area and it remains much larger and more pronounced.
Step six.
Save your photo.
You may want to use the SAVE AS option, in case you ever wanted to go back to your original photo.
YOU’RE DONE!!!!!
*************************************************************************
I hope this helps you. You shouldn't have any problems, it seems like alot of steps, but once you've done it once or twice it's a breeze. Just always be sure to save the edited photo as something else, in case you made a goof or don't like it once it's done. Otherwise you're stuck with it.