SuperColey1
Planted Section
Technical Specs:
30 litre Opti-white aquarium (L 40cm, H 30cm, D 30cm)
Resun CY-20 external cannister filter
50W heater
TMC clip on LED light (8 hours per day)
Fertilisation 0.5ml Kontemplatpro daily
Plants: Fissidens Fontanus, Echinodorus tenellus, Blyxa Japonica, Mayaca Fluviatilis.
Livestock: Bumblebee shrimp (Hummel/Breviata)
Substrate is inert pool filter silica sand
I have been rambling quite a lot on various forums about how the aquascaping hobby was getting a little stagnant. Creativity being limited to small changes within the same theme and that many people were just re-cycling old ideas. I have also said for a few years that rather than being works of Art that the 'top' aquascapes these days were no more than outstanding feats of technical ability that whilst being incredible achievements were more akin to model railway scenery than art.
It has been getting to the stage where people are trying to replicate an image to the minutest detail with no heart and soul to the aquascape itself. They are dictations. They are so 'perfect' that you as the viewer are left with no possibilty of a personal interaction with the aquascape. By that I mean it is what it is. You the viewer accept that. What I like about art is it leaves room for the viewer to have an opinion. To see different things from others and so I started talking about a 'modern Art' style of aquascaping. I am implementing mathematics, geometry and symmetry which goes against most of the 'unspoken' rules that many insist upon in aquascaping.
With this series of scapes I have an idea of what each represents to me however it leaves plenty of room for you the viewer to decide what it means to you. What it is representing to you. So let my madness begin with Exhibit C. The names of these aquascapes are intentionally non descriptive. I don't want to even suggest with a name what I see when I look at the aquascape.
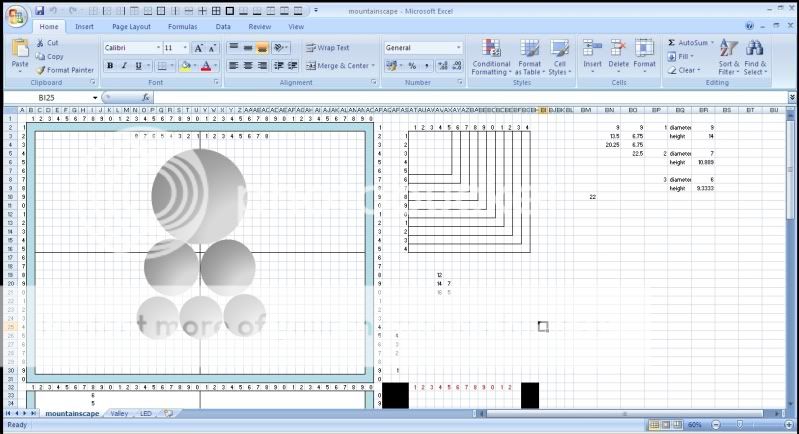
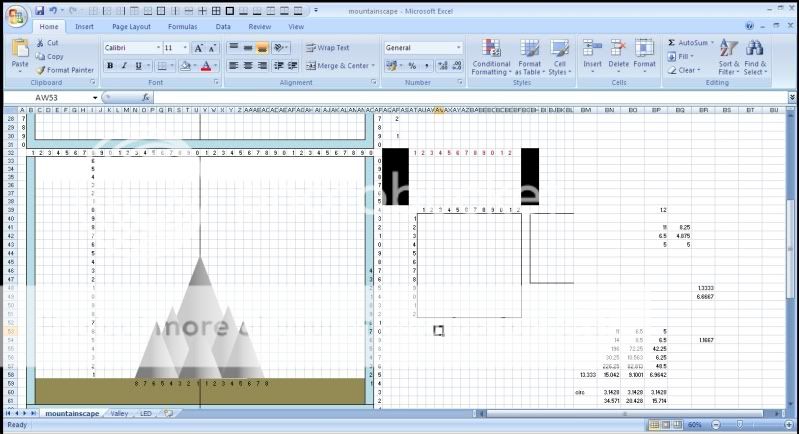
The first picture below was originally drawn up nearly a year ago in September 2011. I then drew it up in MS Paint and decided to do it.


I am using 'Apoxie Sculpt' to make my cones which is an air-dry clay that is safe for use in the aquarium after it has cured. This comes in 2 parts and is mixed by hand 1:1.
I then got out my calculator, compass and some card and made the 'moulds' for the clay to go in. The inside of the mould is covered in sellotape otherwise the clay will take the print from the card into it and that will be permanent/ The tape stops this happening.


I had originally planned to carve or grind granite to form these cones however that would've have probably proved beyond me. I then got a quote from a stoneyard to carve them. It wasn't the expense that stopped me form going that route. It was more a case of this is my piece of art and therefore I wanted to have as much hands on input into it as possible.
I then started researching fibreglass and resins before finding by chance a thread where someone had made caves out of Apoxie Sculpt for his L46 Zebra plecos.
This stuff is far from cheap but after researching heavily it has rave reviews and so I bought up 8lbs (nearly 4kg.) That took £75 from my wallet so it isn't worth making your own branches or rocks if you want natural looking ones. The real thing is cheaper.
The clay is workable for 3 hours and will still warp if allowed to up to 10 hours later so these cones were scored at equal points around the circumference to the tip. If I hadn't scored the card then it would try and flatten itself out and where it is joined would be pointed along that side. The scores stopped that and kept it perfectly 'round'. When I say round it will of course come out as a multi-sided pyramid and not round at all.
After the clay in the moulds had been left for 24 hours, I removed the card moulds to reveal some very shiny pyramids. The sellotape had done it's job perfectly and there is no 'stain' on the clay, nor paper that has become part of the clay. One cool aspect is that you see 'fault lines' where each piece of clay was pushed into another. Looks very rock like to me.


The next step was to work the shapes into perfectly round cones. I don't want pyramids, that was solely to get a stable mould shape. P60 very coarse copper oxide paper was used to 'grind' the high points off to get a rounded cone. This stuff cures quite literally rock hard. Takes a lot of work to get it sanded. After the P60 I went to P240, P400, P800 wet and dry to remove the scratches and the photos below show the differences between the unfinished pyramids and finished cones.
No photos to show the next stage which was to wet some more clay and rub it over the cones to fill any voids. This was then sanded back after 24 hours with P240 onward to smooth it off.


With the cones and most of the plants ready (I have some Blyxa in another tank which I will add in here in the next few days) I started the setup. 10 months since I thought this vision up and now to see if the vision works in reality.
First thing was to add a frosted sheet to the back of the tank. This is simply added by spraying a washing up liquid solution onto the glass, adding the film and then with a squeegy pushing the water and air out.


Then a very important step These cones are hollow and will trap air inside so each has a hole drilled at the top on the rear as you view it. this lets the air out of the cone.

Forgive the photos in the room. The style of the scape doesn't fit the decor around it at the moment. I am in the process of 'gutting' my whole downstairs and modernising it all. This aquarium will be sat atop a gloss white cabinet in a month or so once I have built and finished it.
I drew lines in the sand to mark the exact centre points as mathematics is key to this aquascape. Symmetry is being used and I want equal measurements. The cones are added and the aquarium put into it's place on top of some black camping mat (Neoprene foam.)


Along the front small pieces (1cm) of wire mesh with Fissidens Fontanus attached to it are added. Behind the small cones Echinodorus Tennelus is planted. At the rear Mayaca Fluviatilis is added. The Blyxa will go in front of the large cone in the next few days.
The tank is filled and I am very happy with the result. It almost looks like a digital rendering but I can promise you it isn't. This should look really good once the plants are grown and the full effect can be seen.
The Bumblebee shrimp arrive on Wednesday (3 days time) so this is going to be great to look at.
The little TMC LED light works superbly for what I want here. It is small and I can push it low down and get the 'spotlight' effect over the main composition of the aquarium. No light needed on the sides, just the centre.
One thing that works excellently that many may think 'so what' is that each intersection is an equal angle. The points of the cones, the point where one cone meets another. Each triangle you can see is an equal angle.


Regards
Andy
30 litre Opti-white aquarium (L 40cm, H 30cm, D 30cm)
Resun CY-20 external cannister filter
50W heater
TMC clip on LED light (8 hours per day)
Fertilisation 0.5ml Kontemplatpro daily
Plants: Fissidens Fontanus, Echinodorus tenellus, Blyxa Japonica, Mayaca Fluviatilis.
Livestock: Bumblebee shrimp (Hummel/Breviata)
Substrate is inert pool filter silica sand
I have been rambling quite a lot on various forums about how the aquascaping hobby was getting a little stagnant. Creativity being limited to small changes within the same theme and that many people were just re-cycling old ideas. I have also said for a few years that rather than being works of Art that the 'top' aquascapes these days were no more than outstanding feats of technical ability that whilst being incredible achievements were more akin to model railway scenery than art.
It has been getting to the stage where people are trying to replicate an image to the minutest detail with no heart and soul to the aquascape itself. They are dictations. They are so 'perfect' that you as the viewer are left with no possibilty of a personal interaction with the aquascape. By that I mean it is what it is. You the viewer accept that. What I like about art is it leaves room for the viewer to have an opinion. To see different things from others and so I started talking about a 'modern Art' style of aquascaping. I am implementing mathematics, geometry and symmetry which goes against most of the 'unspoken' rules that many insist upon in aquascaping.
With this series of scapes I have an idea of what each represents to me however it leaves plenty of room for you the viewer to decide what it means to you. What it is representing to you. So let my madness begin with Exhibit C. The names of these aquascapes are intentionally non descriptive. I don't want to even suggest with a name what I see when I look at the aquascape.
The first picture below was originally drawn up nearly a year ago in September 2011. I then drew it up in MS Paint and decided to do it.
I am using 'Apoxie Sculpt' to make my cones which is an air-dry clay that is safe for use in the aquarium after it has cured. This comes in 2 parts and is mixed by hand 1:1.
I then got out my calculator, compass and some card and made the 'moulds' for the clay to go in. The inside of the mould is covered in sellotape otherwise the clay will take the print from the card into it and that will be permanent/ The tape stops this happening.
I had originally planned to carve or grind granite to form these cones however that would've have probably proved beyond me. I then got a quote from a stoneyard to carve them. It wasn't the expense that stopped me form going that route. It was more a case of this is my piece of art and therefore I wanted to have as much hands on input into it as possible.
I then started researching fibreglass and resins before finding by chance a thread where someone had made caves out of Apoxie Sculpt for his L46 Zebra plecos.
This stuff is far from cheap but after researching heavily it has rave reviews and so I bought up 8lbs (nearly 4kg.) That took £75 from my wallet so it isn't worth making your own branches or rocks if you want natural looking ones. The real thing is cheaper.
The clay is workable for 3 hours and will still warp if allowed to up to 10 hours later so these cones were scored at equal points around the circumference to the tip. If I hadn't scored the card then it would try and flatten itself out and where it is joined would be pointed along that side. The scores stopped that and kept it perfectly 'round'. When I say round it will of course come out as a multi-sided pyramid and not round at all.
After the clay in the moulds had been left for 24 hours, I removed the card moulds to reveal some very shiny pyramids. The sellotape had done it's job perfectly and there is no 'stain' on the clay, nor paper that has become part of the clay. One cool aspect is that you see 'fault lines' where each piece of clay was pushed into another. Looks very rock like to me.
The next step was to work the shapes into perfectly round cones. I don't want pyramids, that was solely to get a stable mould shape. P60 very coarse copper oxide paper was used to 'grind' the high points off to get a rounded cone. This stuff cures quite literally rock hard. Takes a lot of work to get it sanded. After the P60 I went to P240, P400, P800 wet and dry to remove the scratches and the photos below show the differences between the unfinished pyramids and finished cones.
No photos to show the next stage which was to wet some more clay and rub it over the cones to fill any voids. This was then sanded back after 24 hours with P240 onward to smooth it off.
With the cones and most of the plants ready (I have some Blyxa in another tank which I will add in here in the next few days) I started the setup. 10 months since I thought this vision up and now to see if the vision works in reality.
First thing was to add a frosted sheet to the back of the tank. This is simply added by spraying a washing up liquid solution onto the glass, adding the film and then with a squeegy pushing the water and air out.
Then a very important step These cones are hollow and will trap air inside so each has a hole drilled at the top on the rear as you view it. this lets the air out of the cone.
Forgive the photos in the room. The style of the scape doesn't fit the decor around it at the moment. I am in the process of 'gutting' my whole downstairs and modernising it all. This aquarium will be sat atop a gloss white cabinet in a month or so once I have built and finished it.
I drew lines in the sand to mark the exact centre points as mathematics is key to this aquascape. Symmetry is being used and I want equal measurements. The cones are added and the aquarium put into it's place on top of some black camping mat (Neoprene foam.)
Along the front small pieces (1cm) of wire mesh with Fissidens Fontanus attached to it are added. Behind the small cones Echinodorus Tennelus is planted. At the rear Mayaca Fluviatilis is added. The Blyxa will go in front of the large cone in the next few days.
The tank is filled and I am very happy with the result. It almost looks like a digital rendering but I can promise you it isn't. This should look really good once the plants are grown and the full effect can be seen.
The Bumblebee shrimp arrive on Wednesday (3 days time) so this is going to be great to look at.
The little TMC LED light works superbly for what I want here. It is small and I can push it low down and get the 'spotlight' effect over the main composition of the aquarium. No light needed on the sides, just the centre.
One thing that works excellently that many may think 'so what' is that each intersection is an equal angle. The points of the cones, the point where one cone meets another. Each triangle you can see is an equal angle.
Regards
Andy
") )
) I'm interested to see where it goes