I'm searching for an easier way to maintain my aquarium and have come up with this. It's essentially two different ideas in one box.
Keep in mind I'm trying to minimize (eliminate, even) extraneous pumps. I trust gravity much more than pumps.
The main process is a constant RO "drip", which forces the overall volume in the system to increase over maximum capacity. This box includes an overflow to drain exiting the system [to the house plumbing or yard].
The second part is a heated holding tank to facilitate greater-than-drip water changes at the flip of a handle.
Below is my rough diagram. (It was sketched in Paint, so please excuse its crudeness and the fact its scale is approximate.) Below the diagram is a brief explanation of the system.
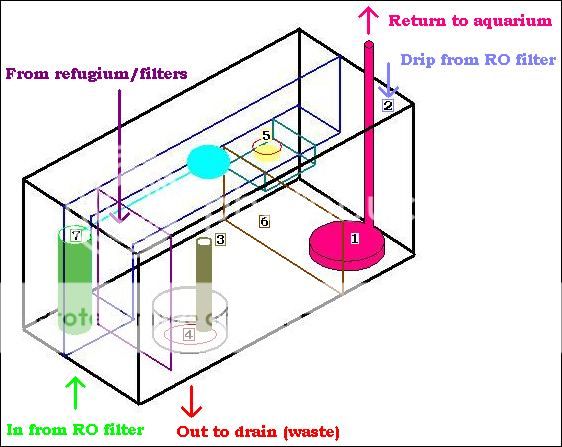
(1) Sump pump returning water from the box to the aquarium.
(2) An RO drip with a variable flow rate.
(3) Overflow leading out of the system (drain).
(4) Flush valve -- the same you'd find in a toilet tank.
(5) Kinetic valve -- a float plugging a hole.
(6) Water-permeable wall.
(7) A Fill Valve -- the same you'd find in a toilet tank.
During normal operation, the sump pump (1) does what you'd expect it to do. Because there's an endless RO drip (2), the tank should never drop below its maximum level. It introduces more volume than the system can hold, so an overflow (3) allows extra water to exit the system and down the drain. This concludes the "one drop at a time water change".
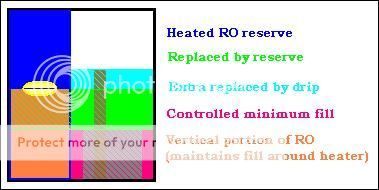
It's hard to see, but you should be able to make out in blue an L-shaped divider separating this tank into a large section and then a smaller section closer to the top of the tank. If you were looking at this from the left side, the long horizontal part of the blue section would comprise the top-left corner. This section of the tank is an interim holding area where new water can be heated (and treated, if necessary) before its introduction to the tank.
SIDENOTE: If anybody knows of a cheap, easier way to heat RO water in its reserve tank, please let me know. Please try to keep pumps out of the system, if possible.
If for any reason I want or need to execute a multiple-gallon water change, pulling a handle will open the flush valve (4) and empty a large portion of water from the tank (-- but never more than the upper portion of the L-shaped tank can hold). Once the water level drops lower than the kinetic valve (5), the float stopper will drop and allow the water in the reserve tank to flow into the main body. Between the sump and drain is a permeable barrier (6) that should prevent most of the water from "backflowing" into the drain. A fill valve (7) with float ball and trip lever will refill the reserve tank with new RO.
DESIGN CHANGE: As I look at this, I think the permeable barrier will instead be a solid piece of acrylic with its bottom raised a half inch or so off the bottom of the tank and its top about the same distance lower than the height of the overflow.
Surrounding the flush valve is a barrier preventing the main tank from completely emptying out. As long as the amount of water contained above this barrier but below the kinetic valve is just less than what the reserve tank can hold, the stopper should close before the reserve tank is completely empty -- preventing new, cold RO from entering the tank.
The actual amount of water "flushed" is roughly the volume of water between the barrier around the flush valve up to the overflow. (Any water volume above the kinetic valve up to the overflow will be replenished by the RO drip.
I'm sure I could type much more about this, but it's late. I'm getting tired, so anything more might not even make sense.
I am open to any and all feedback or suggestions.
Keep in mind I'm trying to minimize (eliminate, even) extraneous pumps. I trust gravity much more than pumps.
The main process is a constant RO "drip", which forces the overall volume in the system to increase over maximum capacity. This box includes an overflow to drain exiting the system [to the house plumbing or yard].
The second part is a heated holding tank to facilitate greater-than-drip water changes at the flip of a handle.
Below is my rough diagram. (It was sketched in Paint, so please excuse its crudeness and the fact its scale is approximate.) Below the diagram is a brief explanation of the system.
(1) Sump pump returning water from the box to the aquarium.
(2) An RO drip with a variable flow rate.
(3) Overflow leading out of the system (drain).
(4) Flush valve -- the same you'd find in a toilet tank.
(5) Kinetic valve -- a float plugging a hole.
(6) Water-permeable wall.
(7) A Fill Valve -- the same you'd find in a toilet tank.
During normal operation, the sump pump (1) does what you'd expect it to do. Because there's an endless RO drip (2), the tank should never drop below its maximum level. It introduces more volume than the system can hold, so an overflow (3) allows extra water to exit the system and down the drain. This concludes the "one drop at a time water change".
It's hard to see, but you should be able to make out in blue an L-shaped divider separating this tank into a large section and then a smaller section closer to the top of the tank. If you were looking at this from the left side, the long horizontal part of the blue section would comprise the top-left corner. This section of the tank is an interim holding area where new water can be heated (and treated, if necessary) before its introduction to the tank.
SIDENOTE: If anybody knows of a cheap, easier way to heat RO water in its reserve tank, please let me know. Please try to keep pumps out of the system, if possible.
If for any reason I want or need to execute a multiple-gallon water change, pulling a handle will open the flush valve (4) and empty a large portion of water from the tank (-- but never more than the upper portion of the L-shaped tank can hold). Once the water level drops lower than the kinetic valve (5), the float stopper will drop and allow the water in the reserve tank to flow into the main body. Between the sump and drain is a permeable barrier (6) that should prevent most of the water from "backflowing" into the drain. A fill valve (7) with float ball and trip lever will refill the reserve tank with new RO.
DESIGN CHANGE: As I look at this, I think the permeable barrier will instead be a solid piece of acrylic with its bottom raised a half inch or so off the bottom of the tank and its top about the same distance lower than the height of the overflow.
Surrounding the flush valve is a barrier preventing the main tank from completely emptying out. As long as the amount of water contained above this barrier but below the kinetic valve is just less than what the reserve tank can hold, the stopper should close before the reserve tank is completely empty -- preventing new, cold RO from entering the tank.
The actual amount of water "flushed" is roughly the volume of water between the barrier around the flush valve up to the overflow. (Any water volume above the kinetic valve up to the overflow will be replenished by the RO drip.
I'm sure I could type much more about this, but it's late. I'm getting tired, so anything more might not even make sense.
I am open to any and all feedback or suggestions.