dojima
New Member
Little background as this is my first proper post.
Setup my first real tank 43G in Feb 09 (eBay job) previous tank was a biorb 60 which served as a good introduction to the hobby. I wanted to minimise internal clutter so went for an External Hydor 300W heater and wanted to ensure adequate filtration with an Tetratec EX1200.
I was undecided about lighting as hood didn't come with any, intended to buy an Interpet compact T5 Twin 55W however they were discountinued when I came to buy which was enough of an excuse to get this project started. I had always liked the dimming LED on the BiOrb with the daytime and moonlight, ultimatley this is what I want to achieve.
I do not intend to be growing plants so the target for lighting is simply to look good with a nice balance that shows of the fish while maintaining a tranquil ambience.
Fish wise I previously had 2 Corys and 2 White Rams ( I Think) from BiOrb
Have added since: 6 White Tip Tetra, 1 Firemouth, 1 Bristlenose Pleco
Everyone appears to get on well
So on with the LED Build...
My experience is limited so it is very much learn as I go, a bit of patience and common sense should hopefully do the job, if I can do it you can to")
Background Reading
Thanks to SuperColey1 and his LED Lighting thread @ Diy Whole Tank Led Lighting Retrofit
Items Utilised (So far)
The primary objective was not cost saving however it is nice when you have parts lying around
Tools: Soldering Iron, Multimeter (Optional)
5 x 3W LED & Driver (You get 5 individual Drivers) - ebay, delivery was just under 3 weeks. ~£18 inc delivery
Ebay 5 * 3W White LED & Driver
12V DC Mains Adapter - Found an old piece of tech in the cellar with a suitable adapter. 12V DC 1.2A
Terminal Block - Wilkos, was cheap like ~50p
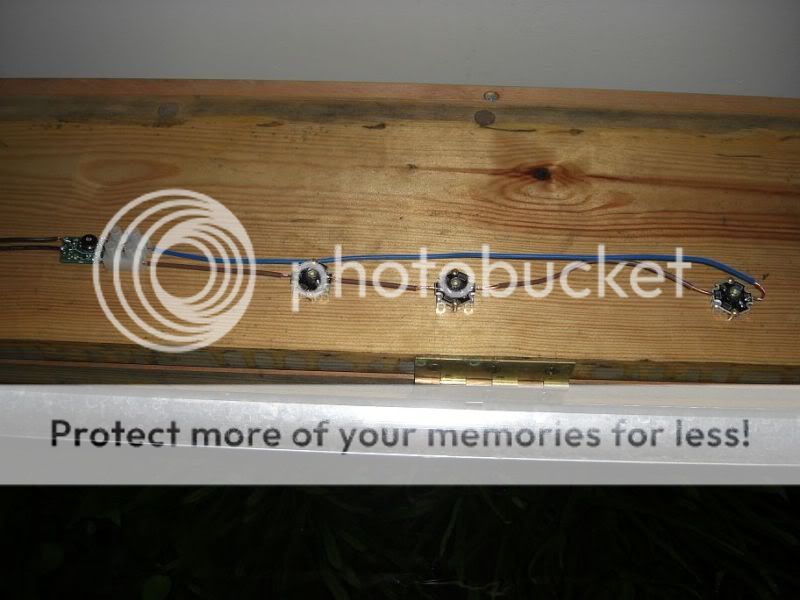
Please excuse image quality, my old compact just aint what it used to be.
Version 0.1
Wanted to get 1 light in for testing and see how it looked. You can see wiring easily from the picture, very straightforward.
Cut off terminal on DC Adapter, pop it in terminal block. Stuck the legs on the driver straight into the block and soldered on to LED. Pink is positive.

In Relation to hood looks tiny.

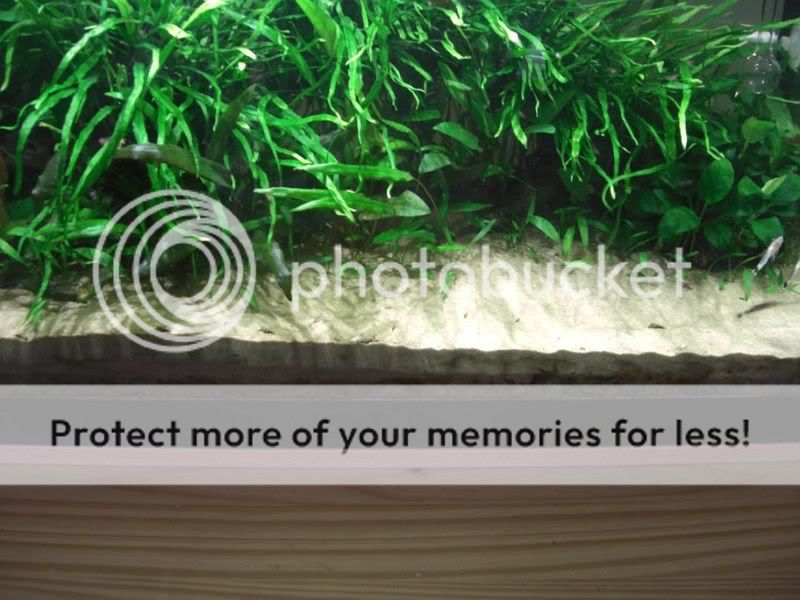
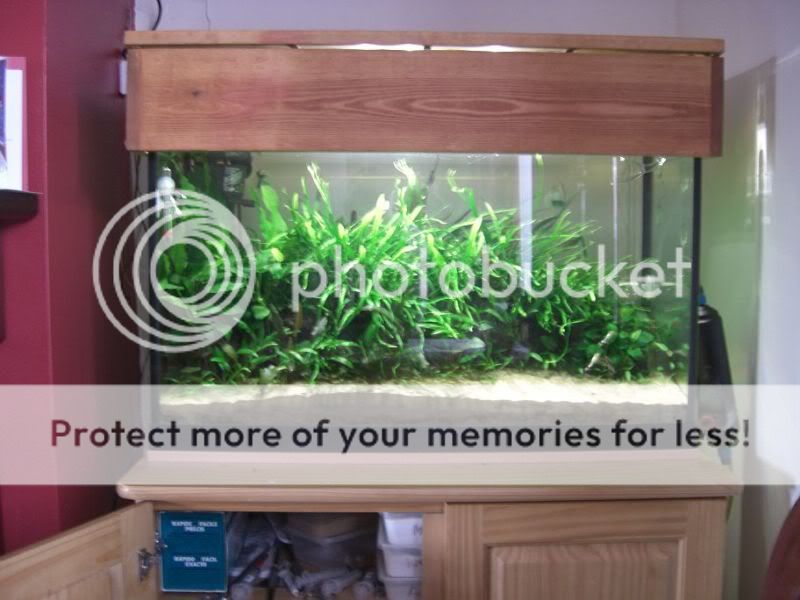
Couple of pictures:
The pictures don't really do it justice, very nice shimmer and faint rays of sunshine effect. It does light the width of tank, you wouldn't know with the picture quality but
there are fish in there.

Future Planning
Want to get all 4 LED mounted and running, thinking I will use a bit of pvc conduit piping mounted onto the hood and then epoxy the LED onto old pc heatsinks and into the pipe.
I imagine I then need to connect all the drivers in parallel to the supply, I know the current one isn't powerful enough so I am thinking it would be good to put an old ATX PSU to use
and convert it into a handy Lab PSU. Found this nice tutorial: ATX Power Supply To Lab Power Supply Conversion
12V 20A wil be plenty.
Added: Higher voltage is preferable rather than higher current output, I require 700ma and enough voltage to to cover the 4 LED so infact a 24V powersupply at 1A would be better.
Further ahead I would like to consolidate it into using 1 single drive like RCD-24 and utilise the dimming functionality however one step at time.
Next Step
Take the test version and create a more permanent installation, add in a heat sink along with detachable hood mounting and detachable power. This will serve as the foundation for the next version.
Any feedback, ideas, suggestions appreciated. Will post as I go...
Setup my first real tank 43G in Feb 09 (eBay job) previous tank was a biorb 60 which served as a good introduction to the hobby. I wanted to minimise internal clutter so went for an External Hydor 300W heater and wanted to ensure adequate filtration with an Tetratec EX1200.
I was undecided about lighting as hood didn't come with any, intended to buy an Interpet compact T5 Twin 55W however they were discountinued when I came to buy which was enough of an excuse to get this project started. I had always liked the dimming LED on the BiOrb with the daytime and moonlight, ultimatley this is what I want to achieve.
I do not intend to be growing plants so the target for lighting is simply to look good with a nice balance that shows of the fish while maintaining a tranquil ambience.
Fish wise I previously had 2 Corys and 2 White Rams ( I Think) from BiOrb
Have added since: 6 White Tip Tetra, 1 Firemouth, 1 Bristlenose Pleco
Everyone appears to get on well
So on with the LED Build...
My experience is limited so it is very much learn as I go, a bit of patience and common sense should hopefully do the job, if I can do it you can to
Background Reading
Thanks to SuperColey1 and his LED Lighting thread @ Diy Whole Tank Led Lighting Retrofit
Items Utilised (So far)
The primary objective was not cost saving however it is nice when you have parts lying around
Tools: Soldering Iron, Multimeter (Optional)
5 x 3W LED & Driver (You get 5 individual Drivers) - ebay, delivery was just under 3 weeks. ~£18 inc delivery
Ebay 5 * 3W White LED & Driver
12V DC Mains Adapter - Found an old piece of tech in the cellar with a suitable adapter. 12V DC 1.2A
Terminal Block - Wilkos, was cheap like ~50p
Please excuse image quality, my old compact just aint what it used to be.
Version 0.1
Wanted to get 1 light in for testing and see how it looked. You can see wiring easily from the picture, very straightforward.
Cut off terminal on DC Adapter, pop it in terminal block. Stuck the legs on the driver straight into the block and soldered on to LED. Pink is positive.
In Relation to hood looks tiny.
Couple of pictures:
The pictures don't really do it justice, very nice shimmer and faint rays of sunshine effect. It does light the width of tank, you wouldn't know with the picture quality but
there are fish in there.
Future Planning
Want to get all 4 LED mounted and running, thinking I will use a bit of pvc conduit piping mounted onto the hood and then epoxy the LED onto old pc heatsinks and into the pipe.
I imagine I then need to connect all the drivers in parallel to the supply, I know the current one isn't powerful enough so I am thinking it would be good to put an old ATX PSU to use
and convert it into a handy Lab PSU. Found this nice tutorial: ATX Power Supply To Lab Power Supply Conversion
12V 20A wil be plenty.
Added: Higher voltage is preferable rather than higher current output, I require 700ma and enough voltage to to cover the 4 LED so infact a 24V powersupply at 1A would be better.
Further ahead I would like to consolidate it into using 1 single drive like RCD-24 and utilise the dimming functionality however one step at time.
Next Step
Take the test version and create a more permanent installation, add in a heat sink along with detachable hood mounting and detachable power. This will serve as the foundation for the next version.
Any feedback, ideas, suggestions appreciated. Will post as I go...
As an eBay Associate we earn from qualifying purchases.

 /www.youtube.com/watch?v=TKGFseTGobE...re=channel_page