Confused about putting together a Fluval 400

Jan Cavalieri

Fish Addict
Pet of the Month 🎖️
Joined
Jun 2, 2019
Messages
935
Reaction score
329
Location
Topeka, KS
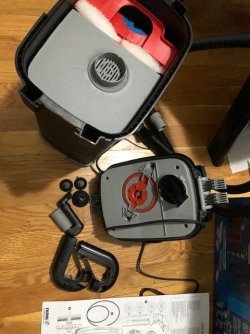
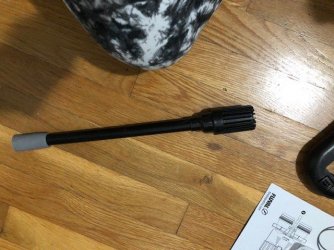
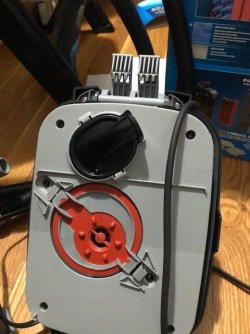
I bought one of these from amazon to put in my 90 gallon tank and to evenually add to all the right sizes to my other tanks. I've got one put together but 1. there are parts left over - it shows them in the picture but I'm not sure where they go or what they connect two. I have that one long piece of hose that you are supposed to measure and use both tubes to connect to the water down to the canister filter inside the cabinet. Looking at the hose I have no Idea how to make that work. I have a 90 gallon tank with a hole at either end. If I cut them there wouldn't nearly be enough tubing to work. Just one of the tubes alone goes from the outtake valve to the filter and it isn't quite long enough. One the other end of the tank is another hole where it looks like the rest of the tank hose should go. But it's Really not close to making it from the round circle tot the Fluval underneath the tank. I bought the right size I thought (It's a 90 gallon aquarium) and this filter should work for even larger tanks. What am I not understanding here? I eventually want all my tanks to have fluvals - I'm so sick of the HOB filter constant clogging up.

Finally we should all take out stock in the media business because if you follow their instructions for all the different and frequently changed media we'd make a fortune!

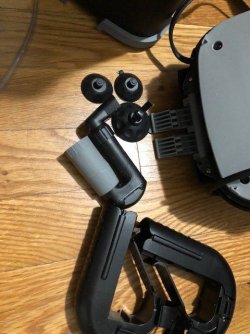
My other two pieces look llke they attach to the fluval hoses and can direct your water. Are both pieces of hoses supposed to be intake hoses - if so I'm really not sure how this works unless you had a tank and filter in the back of the tank like you do for saltwater. This is advertised for both salt and fresh water aquariums. I am LOST.

Also since I have serious problem with white water algae in the 50 gallon tank with the 5 loaches I will not use the media from that tank - so I'll be cycling sort of from scratch. I plan to put a bottle of Tetra Plus (bacteria) in the tank to speed this up. I've waited ages to get this tank, only to recieve ot craccked in two critical places so they are sending me antother one which should arrive in 4-5 weeks. Secretely I don't think shipping did this I think it happened before it shipped, then they attached the black Acrylic panel to it which has no chips at all - but that's between them and the insurance company. I jus know we didn't do it.

So can anybody help please? I can't believe Fluval would make a hose too short and non of their rules mentioned this problem besides me. I can barely read the small type in the instructions even using a magnifying glass.
 
I can do that but what do you want me to take a picture of? The completed looking filter, or the hose or where it's going to sit under the 90 gallon tank? From the stage it looks identica to the picture on the box. I had no trouble with the media in therre. The extra parts? It's not going to look like much
 
I could guess, but I'm not going to.
(Wrong info is always worse than no info ;) ).

So could you please give the proper name of your equipment. 'Fluval 400' in the Amazon search doesn't help much.
 
since you say 90 gallon, i'm going to assume that you have a 407.
this is my 407:
IMG_0339.jpg

(to be honest, i didn't even read the instructions when i was setting it up, but it looks right 🙃)
My other two pieces look llke they attach to the fluval hoses and can direct your water.
i guess you're talking about the red bits? those hold the hose in place.
as for the tube not being long enough, you're supposed to cut the hose in half (two 5 foot tubes), but if that's still not long enough, just order 2 replacement hoses, your tank can't possibly be higher than 10 feet.

(if you need more help, send an image of all of your parts, it's hard to tell what you're talking about)
 
It is a Fluval 407. Sorry for not replying sooner but I downloaded some pictures days ago and they just now showed up. I've been having that problem for a long time. Anyway - I'm attaching the pictures i'm confused about. I forgot to inckude the long hose but we all know what that is. (still haven't figured out where it goes on the aquarium - I have circular holes at each end then two rectangular holes in the centerl These are the areas I'm having trouble with - where to place each part(s) in the picture.
 

Attachments

  • Fluval pic1 .jpg
    Fluval pic1 .jpg
    61.6 KB · Views: 79
  • Fluval pic 2.jpg
    Fluval pic 2.jpg
    65.5 KB · Views: 72
  • Fluval pic 3.jpg
    Fluval pic 3.jpg
    67.3 KB · Views: 84
  • Fluval pic 4.JPG
    Fluval pic 4.JPG
    58.3 KB · Views: 81
  • Fluval pic1 .jpg
    Fluval pic1 .jpg
    61.6 KB · Views: 72
  • Fluval pic 2.jpg
    Fluval pic 2.jpg
    65.5 KB · Views: 77
Thanks I had copied the manual and magnified it's size - I still can't make the size big enough to identify the part (I don't have a laptop I'm working off of a desktop and my printer won't print something that wide so I have to look at the magnified part and pick up a few things that kind of look like it and compare them to the manified screen - and with small parts I can't find a match. Like that small rubber hose that goes around the middle somewhere - I can't tell where it goes on the instructions,

Here are the other kind of things I don't understand: "Attach hosing to the intake connector (IN) on the AquaStop valve; the input connector will be on your left."
Which "left" are they talking about? Doesn't that depend on which way the Fluval is turned? If I'm looking at the Fluval from the front and put the hose on the filter and attach the hose to the input connecter on my left that would be a different place than if the position of the filter stayed the same but I worked on it from the back of the filter that would be the OTHER connecter on my left - so are they interchangeable? Should I just assume that the input connecter is the connecter where all the filter media first goes?.

Another question - iisn't it true that once you've cut the hose, but later change your mind and want to move the shorter one I assume you can't move it very far?


Finally - This is going into a tank with DoJo loaches that will soon be 2 feet long. I will also have at least 2, 6-8" yellow brisslenose plecos. These loaches are strong and they will repeatedly pull off any suction cup inside the tank. My other tank has the plecos in it right now and most are still growing, but I have noticed that they will chew up most anything plastic or rubber which means I don't use many suction cups - I finally found a really good solid suction cup for the heater or it would be swinging around ( another skill the loaches possess is to swing back and forth by the loose heater until it turns back on again - in fact one of the DoJo'S got burned a little. It's actually really funny to watch but after the 20th time or so watch any of this stunts you either give up, find something else that works, or be prepared to reattach and remove suction cups all day.

From what I can tell there maybe a few suction cups that the Fluval uses inside the tank? The ones I've seen so far LOOK sturdy enough (better than the clear ones- I personally hate them

I think some people are just born being a natural at assembling things. When my stepson was about 8 or so he was down the street with a neighbor who was changing his brakes and doing some other things - not only did my step son tell him the next step (he couldn't read well - he was dyslexic) he came up with some different ways of doing thing. Which the neighbor said were all correct. He;s just like that with everything but since his father passed away and he's in another city I wouldn't be comfortable asking him now.

I'LL keep working on it one step at a time. Thanks for your help
 
2.png

the pieces that are marked 1 are the ones that go over the tank's rim (2 suction cups on each side of the glass, i marked it with orange) with the tubing going through them.
number 2 is the part that connects to the outtake tube (going through the #1 pieces) and sits inside of the tank. it doesn't have a suction cup to go with it (which is a problem for me too), so just put one of your own onto it.

the O ring goes around the grey part on the top section of the filter, i don't know how to explain it well.
"Attach hosing to the intake connector (IN) on the AquaStop valve; the input connector will be on your left."
the input is marked near the valve
Another question - iisn't it true that once you've cut the hose, but later change your mind and want to move the shorter one I assume you can't move it very far?
yes, unless you buy a replacement
The ones I've seen so far LOOK sturdy enough
they are not that sturdy, your loaches will get them off eventually.

if you still have trouble, i'll take mine apart tomorrow and give you images.
 
realzalio = thanks for the diagram. I'm planning on trying to fit a few activities in this 90 gallon (It looks so small compared to these fish but I think they all have brain damage from hitting the sides of the 50 gallon,

So the O ring you're referring to is that thin plastic ring I assume goes around the middle to provide some type of seal between they upper and lower parts of the filter- but everywhere I tried to put it there one or more of the clamps got in the way,

And that long gray pole with the little stringy plastic on the end - I see the name of it in the book and it shows it in the instructions but it doesn't say where to put it. I can find any picture on the box that shows where it goes so I assumed it went somewhere inside the filter. So I tried putting it down the middle of the filter and with barely any pressure it broke in half. Now I'm waiting for a new part. ($10) I made a mess with superglue and thought I'd never have the use of three fingers again. Does it hold the impeller? I know a white ball went flying somewhere (I found it) and I could see the impeller down inside - it looks WAY more delicate than the impeller part in the HOB Aquaclear - I broke one of those once and the replacement part was $21 through Amazon - about 1/2 what the entire thing costs. Serious rip offs. And the ALL rip you off with sponges and other filter like material - I just get my stuff at a craft store or garden store -way cheaper.

This thing better filter really well because so far I am unimpressed.

Thanks again for all the help - I'm sure I'll be back I'd keep working on it but since I broke that one part I'm afraid to try to add it until I'm 100% sure where it goes. The pictures on the box are actually better than the instruction - I can always make SOMETHING out of a bag of parts and picture of the opject LOL. but on my box I don't think they show all the inside stuff.

I am SO sick of this, and it's really getting embarrassing like it should be so obvious.

Jan
 
Been looking at it each day from Friday to today. Still don't have a clue where that big stick containing the impeller goes. Seems to me that logically it should be connecting the top and the bottom of the filter or left and right of the filter but there isn't any room inside for it to do that. I was trying to make it fit vertically but that's when it broke, there isn't any way to run it horrizontally either. Thats the FIRST part listed on the filter and I can't even get that step done. Anybody every work with Fluval technical support successfully. I'm past the time I can return it through Amazon but I am seriously thinking about returning it to Fluval but I've looked online at other canister filters and they all seem to assemble in a similar way. I just refuse to go back to the cruddy HOB filters, they are disgusting to clean. I have to clean a quarter of an inch of gunk at the bottom of those fillters twice a week, not to mention you can't have plants in the tank unless you want them sucked into the intake tube. What I don't understand is how such a simple concept of making a filter that is easy to assemble is so difficult. I think they are trying to make them more stlylish looking and that's getting in the way of how you assemble them.

So please - just where does part 1 go? If I get that maybe I'll feel i've accomplished something.
 
Oh and part 1 on my instruction sheet is the same as part 6 on your instruction sheet and is called part "G, H, I" on the last page where it shows how everything is assembled. So I guess it's actually step 1 in one section and 3parts "G,H,I" in the other section - even when those three parts are already assembled and you can't purchase them as individual pieces. So frustrated!!!
 
The impellor (magnet with 3 or 4 plastic blades on one end) goes inside the motor and there should be a clear or grey circle shaped cover holding it in place.

Turn the motor upside down and post pictures of it here.

Post pictures of the broken impellor too.
 

Most reactions

Back
Top