silvershark
Fish Crazy
Firstly, the stuff you need:
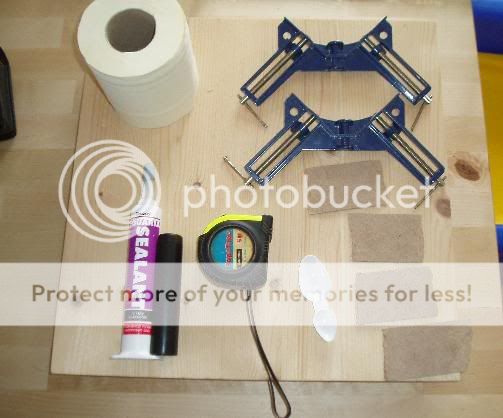
Obviously glass is missing from the pic as i forgot to photograph it!!
Tape measure: needed when planning the size of your tank, measuring glass etc
Tissue paper of some sort: for wiping your silicone covered fingers and tools, BUT NOT FROM THE GLASS!!!!
Silicone: i was trying to find a cheaper alternative but couldn't. For £5 i had enough silicone in this small tube for a 6g. needs to be safe for fish!
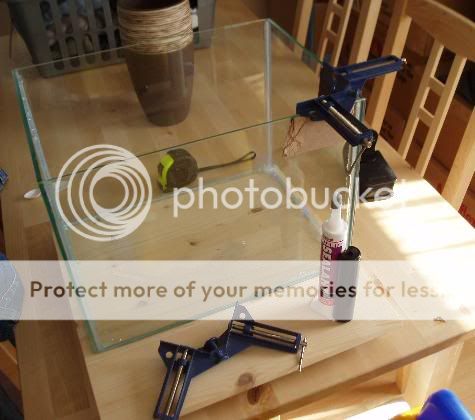
corner clamps: for clamping the panes together while the silicone dries, about £1 each
plastic medicine spoon: for spreading silicone into the edges giving a nice even coat
Wooden working base: so i could move the work in progress out of the kids way!
3mm mdf strips or such alike: for placing between the clamps and the glass, thus preventing any scratches.
First step was to decide how to locate each pane of glass, i arranged mine so that the bottom pane was carrying the other panes on top.
First join was the back to the bottom.
Having glued the softening mdf strips onto the corner clamps i clamped one piece of glass at a time gently loosening the clamps and repositioning where neccessary
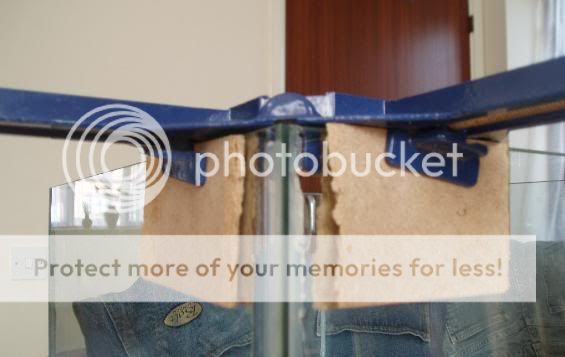
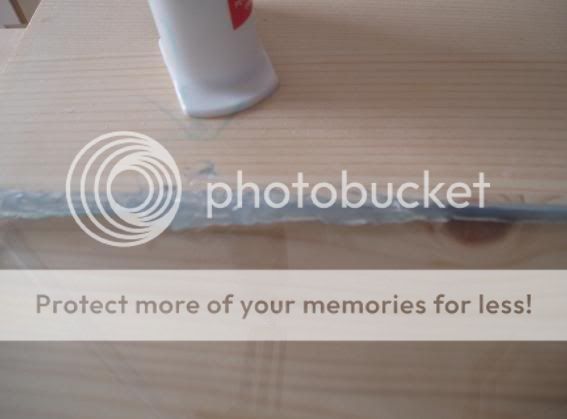
then running a small beading of silicone across the inside of the edge, finishing it using the plastic spoon (at this point i should note that silicone smudges are easier to remove if left to dry and NOT wiped with a cloth or anything!) leave this over 24 hours before removing the clamps.
I hung the corner over the edge of the wooden base i was working on and locked it in my shed, the weight of the glass "should" hold itself on, but please test it for yourself!
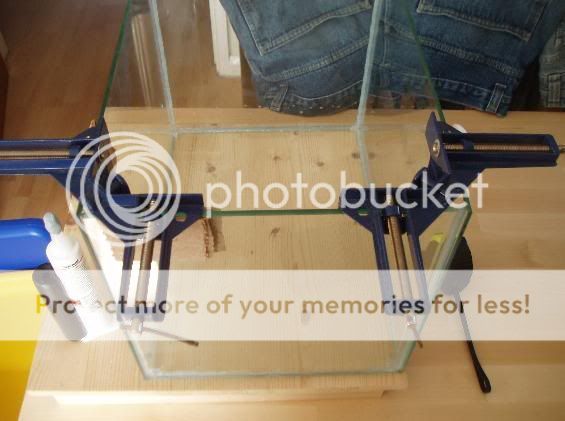
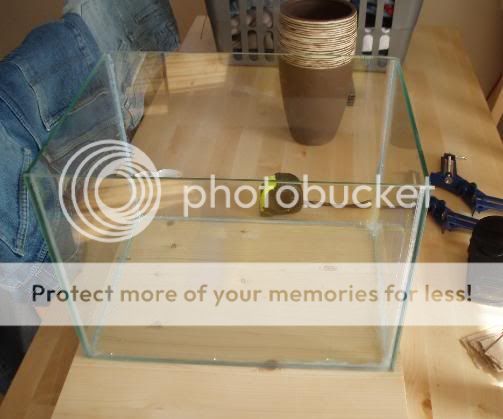
Next join is the front pane
using the same method as above i made a U shape with the glass leaving both ends open at the moment and locking it away the same as before
first end pane followed by final end pane
this was the easy bit (just so long as you've measured and had the glass cut to the correct size!) after another day i tipped the glass "channel" onto its end and slid an end pane into place running silicone all around the inner edge. i found that as it was i nice tight fitting pane of glass that i could tip it up the right way and clamp it, allowing me to tip it to its last remaining edge and do the same as above.
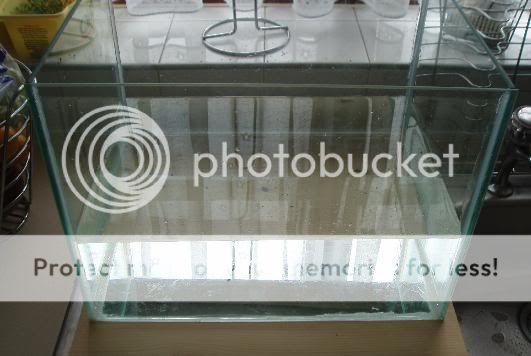
TESTING!!!
firstly its advisable to wait as long as the silicone manufacturors instructions before testing it out for leaks
my first test i lugged the whole lot out into the garden and filled it with just a few pints of water, checking all the seams and leaving it for about an hour to make sure there were no tiny breaks in the seal.
Any leaks were marked with an arrow using a felt pen.
After emptying out the tank, drying it and re-sealing i did another test the next day in the kitchen putting a layer of kitchen towel underneath the tank so i could see if there were even slight leaks
Finalising it
To finalise this tank i'm yet to paint both the back and the bottom completely black. I won't be using any sort of subtrate as this is a hospital, quarantine and breeding tank using sammydees sponge filter idea it can be completely cleared out and suitable for anything.
all critisisms are welcome as this was the first tank i've built and may have missed out some pretty useful stuff!
oh yeah, and i hope this helps too as i may post how i build the stand as soon as it is done!!
Obviously glass is missing from the pic as i forgot to photograph it!!
Tape measure: needed when planning the size of your tank, measuring glass etc
Tissue paper of some sort: for wiping your silicone covered fingers and tools, BUT NOT FROM THE GLASS!!!!
Silicone: i was trying to find a cheaper alternative but couldn't. For £5 i had enough silicone in this small tube for a 6g. needs to be safe for fish!
corner clamps: for clamping the panes together while the silicone dries, about £1 each
plastic medicine spoon: for spreading silicone into the edges giving a nice even coat
Wooden working base: so i could move the work in progress out of the kids way!
3mm mdf strips or such alike: for placing between the clamps and the glass, thus preventing any scratches.
First step was to decide how to locate each pane of glass, i arranged mine so that the bottom pane was carrying the other panes on top.
First join was the back to the bottom.
Having glued the softening mdf strips onto the corner clamps i clamped one piece of glass at a time gently loosening the clamps and repositioning where neccessary
then running a small beading of silicone across the inside of the edge, finishing it using the plastic spoon (at this point i should note that silicone smudges are easier to remove if left to dry and NOT wiped with a cloth or anything!) leave this over 24 hours before removing the clamps.
I hung the corner over the edge of the wooden base i was working on and locked it in my shed, the weight of the glass "should" hold itself on, but please test it for yourself!
Next join is the front pane
using the same method as above i made a U shape with the glass leaving both ends open at the moment and locking it away the same as before
first end pane followed by final end pane
this was the easy bit (just so long as you've measured and had the glass cut to the correct size!) after another day i tipped the glass "channel" onto its end and slid an end pane into place running silicone all around the inner edge. i found that as it was i nice tight fitting pane of glass that i could tip it up the right way and clamp it, allowing me to tip it to its last remaining edge and do the same as above.
TESTING!!!
firstly its advisable to wait as long as the silicone manufacturors instructions before testing it out for leaks
my first test i lugged the whole lot out into the garden and filled it with just a few pints of water, checking all the seams and leaving it for about an hour to make sure there were no tiny breaks in the seal.
Any leaks were marked with an arrow using a felt pen.
After emptying out the tank, drying it and re-sealing i did another test the next day in the kitchen putting a layer of kitchen towel underneath the tank so i could see if there were even slight leaks
Finalising it
To finalise this tank i'm yet to paint both the back and the bottom completely black. I won't be using any sort of subtrate as this is a hospital, quarantine and breeding tank using sammydees sponge filter idea it can be completely cleared out and suitable for anything.
all critisisms are welcome as this was the first tank i've built and may have missed out some pretty useful stuff!
oh yeah, and i hope this helps too as i may post how i build the stand as soon as it is done!!

