
You will need:
2 x CrossStitch grids. Check your local needlework supply store. (Michaels or JoAnns in the USA)
8 x Small, round, strong magnets
Aquarium Sealant
Non stretchy, nylon line (may be called monofilament. Get it from the beading section when you get your cross stitch grids)
Scissors.
A Comfortable seat. Time. Patience.
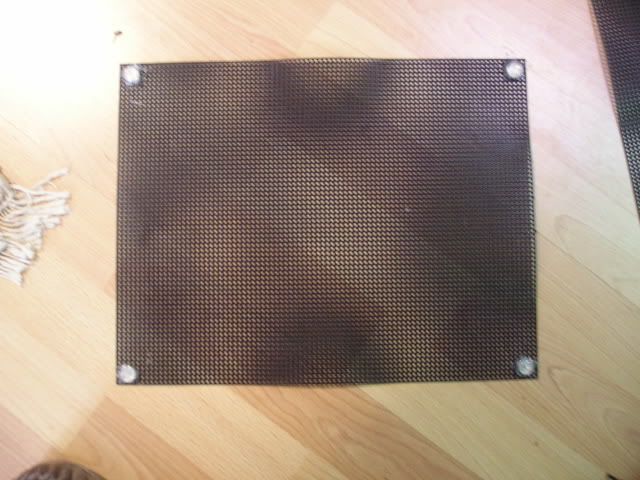
Take your first grid and glue a magnet to each corner. Cover the entire magnet in sealant. They will rust if you don't seal them in the silicone. Leave to dry for at least 24 hours.

Then take your other cross-stitch grid:
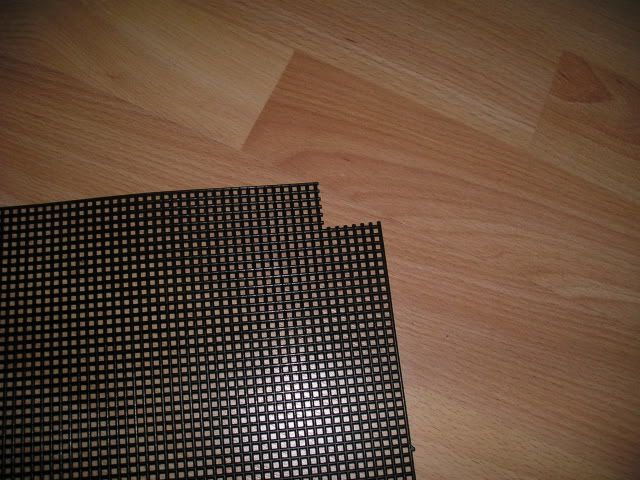
...and cut the corners off as shown.
Now place the moss onto the first grid.
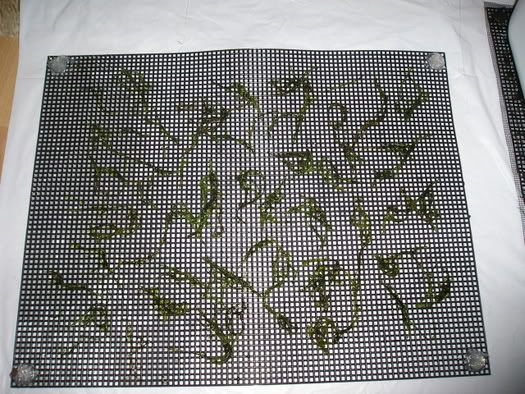
Place the second grid on top and line it up. Cut pieces of nylon line several inches in length. Thread each end through two adjacent squares and tie it TIGHT. Do this every one or two square inches along the grid. This takes a lot of time and patience. You may need to do it in more than one sitting. Take the time to do it properly and your moss wall will benefit. If the two grids aren't flush against each other, then they'll be space inbetween them. The moss wont get enough light to grow inside those little pockets, so it wont start to grow through the holes. Your wall will grow to look patchy and... not good.
Now, once it's all tied together nicely place it in your aquarium. Press it against the black glass, with the magnets at the front, that is do NOT sandwich the magnets between the glass and the grid. Instead you should have the glass at the back, the grid with magnets glued to in the middle, and then the grid with the corner pieces cut out at the front. This will keep your moss wall flush against the back and prevent any fish/shrimp getting trapped behind it. Now just use magnets on the outside to make it 'stick', and you're all set.
(Sorry, no more pictures as yet.)
2 x CrossStitch grids. Check your local needlework supply store. (Michaels or JoAnns in the USA)
8 x Small, round, strong magnets
Aquarium Sealant
Non stretchy, nylon line (may be called monofilament. Get it from the beading section when you get your cross stitch grids)
Scissors.
A Comfortable seat. Time. Patience.
Take your first grid and glue a magnet to each corner. Cover the entire magnet in sealant. They will rust if you don't seal them in the silicone. Leave to dry for at least 24 hours.
Then take your other cross-stitch grid:
...and cut the corners off as shown.
Now place the moss onto the first grid.
Place the second grid on top and line it up. Cut pieces of nylon line several inches in length. Thread each end through two adjacent squares and tie it TIGHT. Do this every one or two square inches along the grid. This takes a lot of time and patience. You may need to do it in more than one sitting. Take the time to do it properly and your moss wall will benefit. If the two grids aren't flush against each other, then they'll be space inbetween them. The moss wont get enough light to grow inside those little pockets, so it wont start to grow through the holes. Your wall will grow to look patchy and... not good.
Now, once it's all tied together nicely place it in your aquarium. Press it against the black glass, with the magnets at the front, that is do NOT sandwich the magnets between the glass and the grid. Instead you should have the glass at the back, the grid with magnets glued to in the middle, and then the grid with the corner pieces cut out at the front. This will keep your moss wall flush against the back and prevent any fish/shrimp getting trapped behind it. Now just use magnets on the outside to make it 'stick', and you're all set.
(Sorry, no more pictures as yet.)

