My 180 Gallon (681 Liters) Build From Start To Finish

The April FOTM Contest Poll is open!
FishForums.net Fish of the Month
🏆 Click to vote! 🏆

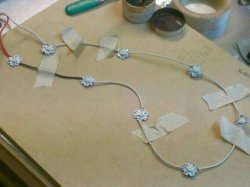
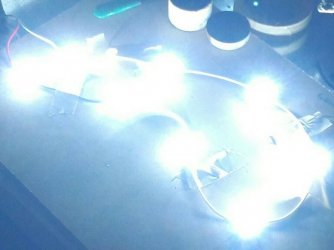
Problems solved. Rewired them all in series with the following results.

Voltage 3.3
Current .750
This gives me a wattage of 2.475 watts per LED, and yes they do get hot.

Just a thought, if I ran 10 LEDs on each driver I would have the following

.750ma
3.3 volts X 10 = 33volts
24.75 watts

This all falls into the correct range for the driver without pushing it
42volts
.750ma constant current not .700ma
.750 X 42 = 31.5watts or 29.4 at .700ma

Now that this is done I will attach the heat sinks and do a test run for 10 hours before I buy the rest of the drivers needed.

We are on our way.
 

Attachments

  • IMG_20140105_025852.JPG
    IMG_20140105_025852.JPG
    62.4 KB · Views: 231
  • IMG_20140105_025915.JPG
    IMG_20140105_025915.JPG
    52.5 KB · Views: 204
Project continues. The LEDs were mounted to the heat sink, the heatsink reached 150 degrees. I ran a large fan over them and the heatsink came down to 95 degrees. All measurements were in sink so I ordered the rest of the drivers.
I started the build on the the stand pictures to follow shortly. Everything should be on schedule for a March completion.
 
Here is a picture of the stand, I still have more work to do on it. I will show more pictures before I skin it.

Do you think it will be strong enough? I stilll have 4 braces to add from front to back on the bottom and one on the top. Your thoughts please
 

Attachments

  • small-rps20140206_215345.jpg
    small-rps20140206_215345.jpg
    37.4 KB · Views: 204
  • small-rps20140206_215703.jpg
    small-rps20140206_215703.jpg
    46.8 KB · Views: 187
One more floor board ans I am ready to skin it
 

Attachments

  • smallrps20140208_214130.jpg
    smallrps20140208_214130.jpg
    55.5 KB · Views: 208
Here is an update on my progress so far. The stand is almost complete except for the moldings on the top bottom and corners, also lets not forget the doors. I took a bit of a break from the stand and started working on the sump. I drilled the holes inside of the tank which was unbelievably easy. I purchased a reflow snapper and external pump at a great price on eBay. With a 10% off eBay coupon I only paid 265.00 with free shipping. I also what is the plan today 180 gallon drilled with corner overflows Marineland. The tank cost me 650.00 delivered, what a great price. Here are some pictures and off to work on the sump I go. I will update again after the sump is done and the tank is on the stand.
 

Attachments

  • smrps20140226_215557.jpg
    smrps20140226_215557.jpg
    71.8 KB · Views: 196
  • smrps20140226_215708.jpg
    smrps20140226_215708.jpg
    42.8 KB · Views: 194
  • smrps20140226_215438.jpg
    smrps20140226_215438.jpg
    42.4 KB · Views: 198
  • smrps20140226_215348.jpg
    smrps20140226_215348.jpg
    49.1 KB · Views: 186
Well the tank made it in. Just finished up on the chambers on the sump. Looking good and excited.
 

Attachments

  • smrps20140301_112605.jpg
    smrps20140301_112605.jpg
    44.5 KB · Views: 211
Update :)

The sump is almost comlete. One more hole for the overflow and I will take some pictures.

Started on the automatic drip system along with a drain.

The drip system will have a carbon and sedement filter.

NO MORE WATER CHANGES NEEDED YEAAAAAA

For a 180 I think .5 gallons an hour should be good. This will give a total of 84 gallons a week (45%)

Pictures will be up by weekend.

After this I will start the tank plum and get the sump in place.

My March end looks likeit will be missed as I still have a lot to do :*(

Can anyone recomend a good c02 setup? I was looking at the Milwalkee.
 
Just finished the drip over flow and the auto drip feed lines. I did a leak check under presure by combinding the 2 lines with 1/4 inch tube. Next will be to close the wall ans drill my overflow in the sump. Here are some more pics. I added a check valve with a flap not spring loaded. This will protect the sump in the event thr drain overflows. I also added a u trap to hold water to prevent gases coming up frow the drain.
 

Attachments

  • smrps20140308_001216.jpg
    smrps20140308_001216.jpg
    22.1 KB · Views: 218
  • smrps20140308_001255.jpg
    smrps20140308_001255.jpg
    46 KB · Views: 189
  • smrps20140308_001346.jpg
    smrps20140308_001346.jpg
    34.3 KB · Views: 205
Well another update.


The sump is complete and the wall is back in one piece. The only thing I need to is add the ceramic rings under the section where the socks are.

Would appreciate comments.

Now on to the rest of the plumbing

smrps20140308_150741.jpg
 

Attachments

  • smrps20140308_150619.jpg
    smrps20140308_150619.jpg
    60.3 KB · Views: 231
  • sm%0Arps20140308_150655.jpg
    sm%0Arps20140308_150655.jpg
    55.4 KB · Views: 192
  • smrps20140308_150831.jpg
    smrps20140308_150831.jpg
    58.3 KB · Views: 185
Well the wife had me out from 10 this morning until 4, so I had a late start. Put in about 2 hours and got most of the plumbing complete just need one or two more nites. Then I will be finishing up the stand and then on to the hood. Once the under is compete I will post more pics.
 
Brilliant journal mate, thank you for sharing. Unfortunately I no nothing about wiring or the sumps as my tanks are all shop bought.
Have you had any more thought about your stocking list yet ?
 
msebar said:
Started on the automatic drip system along with a drain.

The drip system will have a carbon and sedement filter.

NO MORE WATER CHANGES NEEDED YEAAAAAA
How are you adding dechlorinator to incoming supply ?
 
The drip system will have a carbon and sedement filter.
 

Most reactions

trending

Staff online

Back
Top